When adding water to the kitchen for the first time, consider yourself very lucky. In this case, you can immediately do everything ergonomically and correctly - arrange comfortable access to the system and a “dry” way to replace equipment. When connecting to a ready-made network, there are also chances to not only install a faucet in the kitchen, but also install pipelines according to the above template. Today we will deal with both the first and second options.
You will be able to perform all the manipulations yourself, without the help of specialist plumbers. It will be two in one - you will acquire new skills and save your family budget.
Take into account
Security questions:
- Risk areas arise when water is supplied to the system at various connections, where rubber or rubberized products act as gaskets.
Advice: plan the installation of pipelines in such a way as to minimize the number of connections in the area between them.
- Installation of shut-off valves. Usually they are recommended to be installed on the main pipeline, and then to it.

Advice: a good rule of thumb is that each water distribution point must be equipped with a shut-off ball valve.
Then you have the opportunity, if necessary, to block the desired area without affecting the entire system.
- Plumbing equipment. How many times have they said that a low price is not your luck when purchasing, but usually quite the opposite. Inexpensive equipment and connecting hoses often have poor manufacturing quality, so they rarely last the warranty period.
Tip: one of the ways to choose the right mixer is to focus on the brand and customer reviews.
In both cases, operational reliability approaches 100%.

Preparation
We invite you to familiarize yourself with useful little things that will help you in your future work. Ultimately, the final result will depend on them:
| Mixer | The main criteria should be added that the spout should be directed to the center of the sink. Pay attention to the complete set of the product, which includes flexible hoses and gaskets (rubber, silicone or paronite). Check the warranty mark in the instruction manual. |
| Nuts | When purchasing, pay attention to the diameter of the connecting nuts and couplings. The standard option is 1/2″, but if it is larger or you decide to connect the equipment directly to the main pipe, use an adapter. |
| Mixer socket | When the sink already has a hole for the tap, check that its diameter matches it. In its absence:
|
| Tool | You will need a minimum set - a screwdriver, pliers, 2 adjustable wrenches. We recommend stocking up on WD-40 lubricant, which will make it very easy to installation work old equipment. |

Start of the process
The instructions below will answer all questions related to installing a faucet on a kitchen sink. We recommend that you first cover the area of intended work with packaging cardboard or other material so that metal parts falling from a height do not damage the floor covering or cabinet. If possible, move the sink away from the wall.
Tip: if access to the mixer is possible only from one side, remove everything that will interfere with work.
This is usually a wastewater disposal system.

In the photo - shut-off valves will allow installation without shutting down the entire water supply system
Installation
The step-by-step work will look like this:
- Place the entire structure in the prepared nest. You can clearly see this in the package insert provided by the manufacturer.
So:
- Install a rubber gasket on the hole;
- place a metal base plate on top;
- insert the mixer itself;
- Place another gasket on the metal threaded stud from below;
- tighten everything with the fastening nut.
Tip: there are fasteners that do not have an internal rubber ring. Fixation is done manually without any tools. This should be written in the equipment assembly manual.

- Connect the cold and cold line into your sockets. hot water . The clue will be the logo on the faucet lever, which has a “red” and “blue” half, respectively.
Tip: you can install the hoses before installing the mixer in the sink hole, this is not important.
- Take an adjustable wrench and connect each hose to its own line.
System startup and repair
Connection, as you can see, is not complicated, the main thing is to be careful in your work. All that remains is to make the first launch of the system, which will answer many questions.
In a household, situations often arise when plumbing equipment requires preventive maintenance, repair or replacement.
Some of the most common types of home projects include repairing or installing kitchen faucets. It is not always convenient from a practical point of view to call a plumbing specialist to carry out this procedure.
Replacing a kitchen faucet for hot and cold water carried out independently will help save money and increase the owner’s technical skills necessary in everyday life.
There are several types of faucets, differing in their internal design and the method of supplying water to them; unlike devices for bathrooms, which are located on the wall, kitchen types are mounted directly on the sink.
When is replacement needed and when is just repair needed?
In most cases, mixers last about 10 years; if they fail, you should distinguish between situations when they require repair or replacement.
Installation of a kitchen faucet is usually carried out in the following cases:
- The old model of the sink faucet is outdated and does not fit the design new kitchen or the owners were simply tired of it.
- The mixing device has irreversibly damaged housing or parts that cannot be replaced (outflow in a single-lever non-separable model).
- When purchasing a modern sink or a more functional model (several bowls), you may need to replace the faucet with a different design.
Tap selection
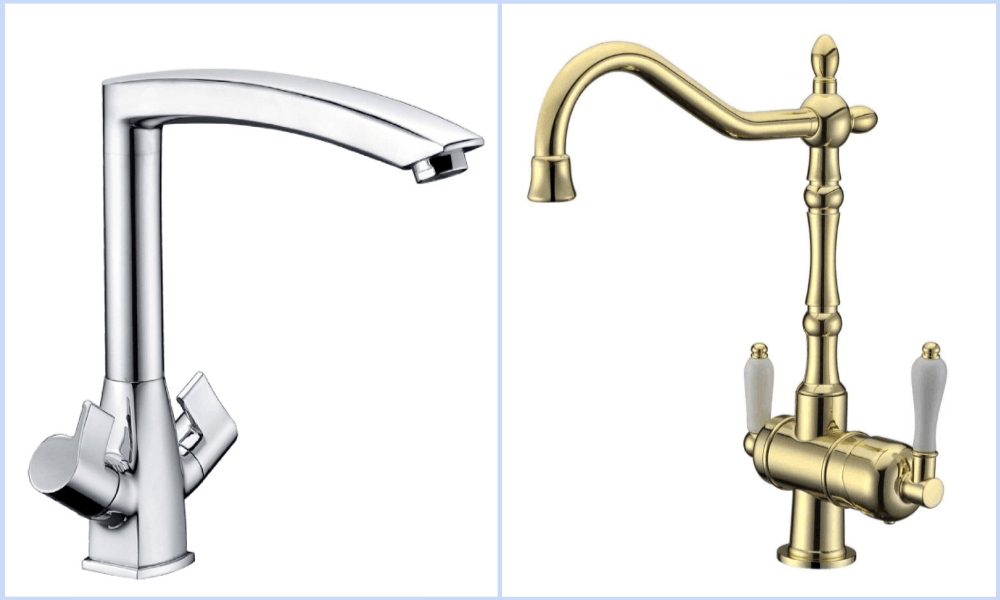
When choosing a faucet for a sink, several options are considered: single-lever, two-valve, touch.
- There is no alternative to single-lever types when choosing a sink mixer - they are simple and easy to use, have a wide range and affordable price, and are designed to work in various sink designs.
- Two-valve devices are used quite rarely in modern kitchens due to the inconvenience of operation - for installation temperature regime and flow requires control of two handles. They are purchased as a budget option or, on the contrary, as a very expensive exclusive, made to order for a certain style of kitchen space (retro).
- Touch sensors are the most modern and technologically advanced; they have no competitors in terms of ease of use: just place your hands or any object within the range of the infrared sensors - the water turns on automatically. The device does not have valves to turn the water on and off; a built-in battery is used to control the mechanism. Touch models allow you to pre-program the temperature and pressure of the water jet; to change the operating mode, you need to install another program. In the kitchen, water supply patterns are constantly changing, so using these types is impractical.
Single lever mixer
Single-lever devices have a simple design in the form of a body of two main components or a permanent connection; water flows are controlled by a cartridge built inside with a lever for attaching the handle.
All modifications of single-lever devices have a unified design to fit the dimensions of the built-in cartridges and differ in the shape of the body and spout.
Single lever mixer models
Two-valve models
In devices with two valves, hot and cold water is turned on and shut off using worm or ceramic shut-off elements. The valves have a standard design; the body and spout may differ in different models.
Two-valve mixer housings
Preparatory work
Before replacing the mixer, purchase the device itself and the necessary components, and prepare plumbing tools.
Installation work consists of the following stages:
- Disconnecting hot and cold water from the apartment's common water supply.
- Freeing the sink from water pipes protruding from the wall, dismantling the old faucet and preparing the mounting hole.
- Installing a kitchen faucet with your own hands in a sink with connecting supply hoses.
- Connecting the sink to the drain and water pipes, installing the cabinet with the sink in place.

Appearance of fasteners when connecting the mixer using a clamping nut and studs
When purchasing supply water hoses, you should take into account the material of their manufacture, which affects the physical characteristics and service life.
The standard liner consists of an internal environmentally friendly rubber tube and an outer braid made of several materials: aluminum, stainless steel or nylon.
Products with aluminum braiding are short-lived, their average service life is no more than three years, while stainless steel braiding increases the service life of plumbing connections up to 10 years. There are reinforced varieties of flexible hoses that combine several braiding materials, designed for high pressure with a service life of up to 15 years.
When choosing a product, it is advisable to ask the seller what it is made of; usually, cheap Chinese crafts, in addition to aluminum braiding, have output fittings and couplings made of silumin, a cheap alloy of aluminum and silicon. Silumin has higher strength and wear resistance than ordinary aluminum, but is weaker than duralumin alloys and is highly brittle.
In the absence of information about the material of manufacture, you should choose a modification with greater weight compared to similar models - this indicates the presence of stainless steel braiding and outlet fittings made of more expensive non-ferrous metals (brass, copper).
A product whose internal rubber tube is highly elastic will have a longer service life - when purchasing, you should choose a more flexible and ductile liner.
There are water hoses for hot and cold water with a corresponding color designation on the braid: for cold water, part of the braid is painted in Blue colour, for hot – in red, in universal types the given colors are combined.

Flexible connection for cold and hot water pipes
Necessary consumables
To fasten water supply hoses, additional sealants and sealing parts are usually not required - the gasket, which is built into the union nut, and the rings on the external thread of the outlet fitting, when installed correctly, provide reliable sealing.
Sometimes you may need flax or fluoroplastic sealing material (FUM tape), sealing paste (Unipak), or household products for cleaning limescale or rust.
When carrying out plumbing work involving the removal of a built-in sink from a countertop and its subsequent installation, you may need silicone sealant to protect the edges of the cut hole from moisture.
How to remove a kitchen faucet
Before disassembling the faucet in the kitchen, they prepare plumbing tools and components; dismantling and installing new equipment is often accompanied by replacing supply hoses, which lose their properties over time and can be damaged when unscrewed.
Short hoses are supplied as standard from the factory; upon purchase, they often have to be replaced with long ones in such a way that they sag freely during installation.
Before unscrewing the tap, the old fasteners, if rust and limescale appear on them, are treated with household chemicals (Cillit, SanTiv) and left for a while, after which it is much easier to disassemble the water tap. In a similar way, the threads on pipes are cleaned of rust and lime deposits.

Dismantled sink from the countertop, removal of the siphon
Dismantling process
To disassemble a kitchen faucet, you need to perform the following operations:
- The device is disassembled after the water is turned off, first the siphon is untwisted and disconnected from the sink, then the water supply hoses can be unscrewed from the water pipes with a wrench.
- When the sink is installed in the countertop of the kitchen cabinet near the wall, it is quite difficult to unscrew and dismantle the mixer - it is easier to remove the sink outside to continue further work. To do this, simply lift it or unscrew the fixing bolts and fasteners in the case of a mortise model.
- Before removing the faucet from the sink, it is turned over for better access to the fasteners, then unscrewed by hand or using a liner wrench.
- Further disassembly involves unscrewing the body from the sink: depending on the type of fastening (washer or studs) and for ease of operation, use an adjustable or socket wrench of a suitable diameter or a flat-head screwdriver.

Cutting holes in the sink with a mechanical cutter
How to install a faucet correctly
Before installing the faucet in the kitchen sink, remove it from the old device and clean the installation area from limescale. The faucet is installed differently depending on the design of the fastener.
It is easier to change a kitchen faucet that has a thread in the lower part of the body for fixing the union nut; in addition, the design provides a stronger and tighter connection to the sink.
If you install the housing on studs, installation will take longer, and the connection will not be very stable and tight and may become loose over time.
Crane assembly
Typically, a single-lever model is supplied assembled; before installing it, you need to check the threaded connections for ease of assembly by first tightening the studs or nuts into the body.
To correctly assemble all connections during installation, it is useful to use the recommendations and diagrams given in the attached instructions.

Replacing a kitchen faucet with a nut fastening
Preparation for installation
Sometimes it is easier to install a faucet in a sink that is built into the countertop without removing it - you do not need to unscrew the fasteners and remove the entire structure, or cut off the silicone seal around the perimeter of the cut-out hole in the sink. In this case, preparatory work for dismantling will have to be carried out below the countertop; in the case of a modular kitchen, for convenience, you can move the cabinet away from the wall and carry out installation work at the back wall.
Some types of faucets, for example, for supplying filtered drinking water, are additionally installed in the sink - in this case, they independently cut out a mounting hole of a suitable diameter.
This work can be done in several ways: using a ballerina to cut holes in ceramic tiles, a manual mechanical cutter, or a cylindrical crown to create through holes in metal. To automate the work, you can use a household electric drill, hammer drill or screwdriver, in which a ballerina or crown is clamped.
Installing the faucet
Before installing a faucet in the kitchen, prepare tools and components; depending on the type of fastener, work is carried out as follows:
- The easiest way to install a model with a clamping nut that ensures reliable fastening on the sink is to screw the supply hoses into the body, push it into the hole and secure it with a nut with a rubber gasket and an adjustable wrench.
- When designing with threaded rods, proceed in the same way: connect the connections and studs to the body, insert it into the sink and press it with nuts through a metal plate with a rubber gasket.
Installing a faucet in the kitchen with your own hands on a stud
Connection to water supply
The installed plumbing fixtures are connected to the water supply - the water supply is made using flexible hoses, manually screwing them to the housings and pipes with some force. If there is a leak, you can lightly tighten the outlet fitting and the union nut with an adjustable wrench, but it is important not to twist the fasteners - in this case, the gaskets may be pinched and damaged, leading to a failure of the seal.
When installing the liner, you should not pull it, twist it or bend it too much - this significantly reduces its service life.
Functionality check
To check the correct installation, wipe all parts dry with a rag and turn on the water: places of possible leaks can be identified by running your hand over the parts, but it is better to use a small piece of a dry white rag. When it touches the installed plumbing units in places of leaks, clearly visible water marks remain on the fabric - this allows you to more accurately determine the leak points.
What to look for and possible mistakes
One of the main operations when installing plumbing is the correct connection of flexible hoses supplying water. When installing, it is important not to pinch the rubber ring - for this, the couplings are screwed on by hand with force; the use of additional linen and synthetic seals is not required.

The time comes and many owners of apartments and private houses are faced with the question of how to change the faucet in the kitchen. There can be many reasons, and first of all it is worth finding out whether it is possible to replace the faucet in the kitchen with your own hands, without involving a professional plumber in solving the problem.
It is worth saying that in the process of replacing a faucet in the kitchen, there is nothing complicated, you just need to follow a certain sequence of actions. And first of all, you should choose a device that will be most convenient and suitable for the style of your kitchen.
Faucet selection
The question of choosing a mixer is not as simple as it might seem at first glance. Currently, their range on the market is represented by dozens of companies, hundreds of models and thousands of price options. Therefore, huge shelves and display cases can cause confusion.
Tip: The first step to take before you decide to change your kitchen faucet is to choose a device before visiting the store. And our portal is ready to provide you with all the necessary photo and video materials with which you will purchase a high-quality and functional device.
Selecting a mixer depending on the internal device
- . A simple and familiar design from childhood: a spout located between two faucet axle boxes. The water supply is regulated using valves.
This design, although it has a relatively low price, has ceased to be in great demand. The fact is that individual components, in particular gaskets, are short-lived.

- . Popular with most modern buyers. And this popularity can be explained by the fact that the desired water temperature and water pressure can be set using one movement of the hand. Or an elbow, or a little finger.

- . Stylish, modern and comfortable design. When you put your hands near the sensor, which is built into either the sink or the body, water flows. You will have to pay decent money for such an electronic device. Therefore, these products occupy a modest market segment.

Faucet spout is an important factor
Next, you need to resolve the issue related to the height of the mixer spout. If it is high, then as a result of strong pressure, water can splash in all directions. If the spout is too low, it is inconvenient to wash large dishes. Therefore, it is worth choosing something in between.
It is important that the faucet is matched with a sink that has adequate dimensions. If you have doubts about your choice, you should give preference to those manufacturers who comprehensively solve this problem. A complete set, which includes a faucet, a sink and, of course, additional accessories, will help resolve this dilemma.
Perhaps you will pay attention to the possibility of using a modern kitchen assistant - a mixer with a pull-out spout. In various models, the spout can be removed from the socket by 60-120 cm. The use of modern materials in the manufacture of hoses allows us to obtain a high-quality, durable and hygienic kitchen device.
Nozzle design
The nozzle design can be made in two versions.
- The usual aerator at the end, which is familiar to everyone.
- Shower head operating in two modes: aerated jet and shower. Using the “shower” mode will allow, for example, to wash berries or herbs quite carefully without damaging them. Well, and, of course, caring for the sink will be easier.

Materials for kitchen faucets
The service life of any device is determined by the material from which it is made. Currently, faucets are made from metal, plastic, as well as stone-style kitchen faucets.
- Metal alloys.
The production of mixers that have a budget price category is made from an alloy of aluminum with silicon, the so-called silumin. These devices are not particularly aesthetically pleasing and cannot boast of outstanding durability.
Brass and bronze are metals that have an excellent recommendation in the market. Durable, durable, water-neutral devices made from these materials are durable and long lasting. And they can be called the best kitchen faucets.
- Plastic.
Inexpensive, high-tech material that can adapt to the needs of any kind. Lightweight and durable material, chemically neutral to water.
It has low thermal conductivity, which is important in case of strong heating of the mixer parts. But still inferior to metals in terms of service life.
- Stone kitchen faucet.

Stone-effect kitchen faucets represent a new direction in the kitchen interior. Such faucets are produced by casting, and if artificial stone is used, then an object of any shape can be cast. Among these items is a faucet, which has unique decorative characteristics.
A stone faucet can have almost any color, but neutral ones are more popular: black, graphite, white. They fit perfectly with most existing sinks. Among the advantages of stone-look faucets is the ability to take any, even the most fantastic, shapes.
Kitchen taps need to be replaced periodically. They are operated in harsh conditions and are subject to large quantities detergents, which causes them to become unusable or simply lose appearance. Therefore, many people come to the need to change their kitchen faucet. But you don’t have to call a plumber for this. Replacing a faucet in the kitchen is a simple job, you can do it yourself, and they will ask for a decent amount of money for it. We save money and do everything ourselves.
Replacing a kitchen faucet - you can do it yourself
What is needed for work
Replacing a kitchen faucet consists of two stages: first, remove the old one, then install and connect the new one. In addition to the new faucet, you will need wrenches of the appropriate size and some auxiliary materials. Most often, you need keys for 10 and 11, 22 and 24. In order to remove the mixer from the countertop or sink, you will need two adjustable wrenches.
One more thing. You will most likely need new hoses. Although most kitchen faucets are equipped with flexible hoses, their length is 30 cm. This is not always enough. Before starting work, you need to make sure that the standard hoses are long enough.

It depends on how far the cold and hot water pipes are from the mixer. The hoses should sag slightly, because when you turn the tap on/off, there is a sharp change in pressure, which causes the hoses to twitch. If they are tight, the connection will very quickly become loose and leak. So, if there are 25 cm or less from the pipes to the mixer inlet, standard hoses will be enough. If more, buy longer ones. And advice: buy high-quality ones, not the cheapest ones. They quickly become unusable and can flood both you and your neighbors below, if there are any. Therefore, take flexible hoses made of stainless braid or corrugated stainless pipe. They will serve for a long time and without complaints.
To purchase hoses for a kitchen faucet, you will need the size of the “needle” - the tip that is screwed into the faucet, as well as the diameter of the pipe and the type of end (male-female) - in order to select the right fittings.
To seal the joint you will need linen tow with a sealant paste or fum tape. You will need various gaskets and o-rings (should be included in the kit, but just in case, find everything you have).
How to remove the old one
Before starting work, turn off the water supply to the tap and drain the remaining residues that are in the pipes. Now you can start replacing your kitchen faucet. To remove the old faucet from the sink, you need to unscrew the nut that is screwed onto its body from the bottom of the sink. If the sink is installed in a kitchen cabinet, it is very inconvenient to work. It's better to remove the sink. To do this you will have to:

Now you can lift the sink and turn it over. Here you will see a nut that needs to be unscrewed. For this job you will need two adjustable wrenches. One holds the body on the “front” side of the sink, the other unscrews the nut.
Sometimes it is very difficult to remove an old faucet in the kitchen: it gets stuck. For this case, kerosene or universal lubricant in WD-40 cans is suitable. Both substances have low density and are able to seep into microscopic cracks. The compound or kerosene is applied to the connection that needs to be disassembled, wait 10-15 minutes, and try to unscrew it.
If all the tricks do not help, there is a simple method that is suitable if you are not going to use the old mixer anywhere else: you can use a grinder to cut the body together with the nut. The method is tough, but after suffering for an hour trying to remove the nut, they resort to it.
If the faucet is installed on a countertop, you will have to work “from the inside” - crawl into the cabinet with a flashlight and unscrew the nut.
Kitchen faucet installation
The kitchen faucet replacement is nearing completion. Now we assemble the tap and install it in place. It is much more convenient if work can be carried out on a removed sink. If this is not possible, all manipulations will have to be carried out reclining in the closet. About the same as in the photo.

Assembly
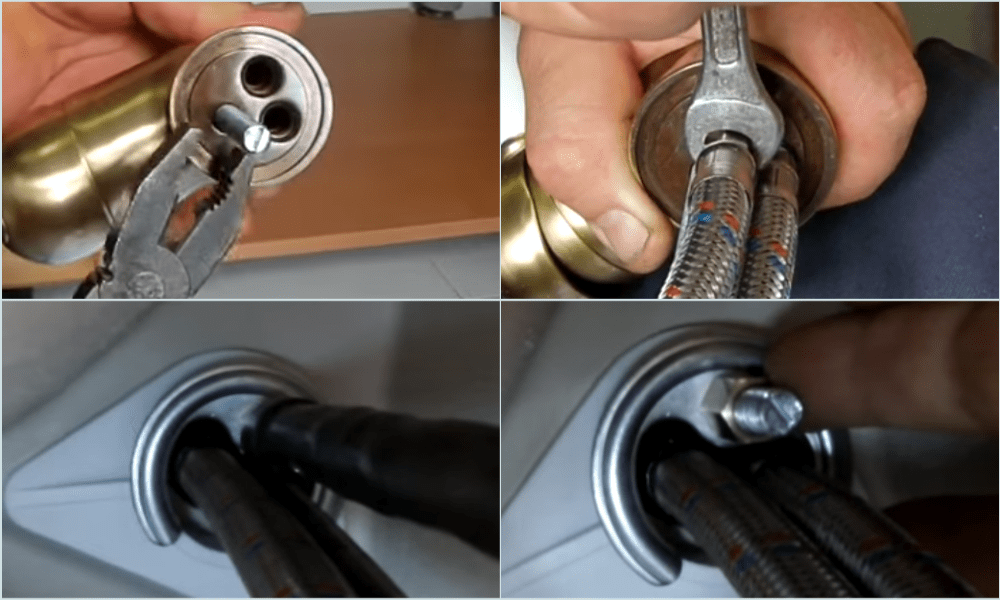
First, we screw the flexible hoses to the mixer. They are screwed in by hand, then tightened a little with a wrench - no more than 2 turns.

Now you need to pull a rubber gasket onto the body, which seals the junction of the mixer and the surface of the sink. This rubber ring of decent diameter is included in the kit. It is pulled through the installed supply hoses and placed on the body.

Modern kitchen faucets have two different shapes fastening to the sink. You saw the first one - using a nut - in the part where we talked about dismantling the mixer. It's just an "older" system. The second provides for the presence of rods and spacers-retainers in the form of a horseshoe. There is usually one rod, but there may be two. If there are such rods, they are screwed into the corresponding socket. If there is a nut on it, remove it.

Installation on the sink
Now the kitchen faucet can be installed on the sink. First, flexible hoses are inserted into the hole, then the housing is placed in the center of the hole. Further actions depend on the type of fastener. If it is an ordinary nut, simply tighten it, being careful not to overtighten it.

If it is a model with rods, the appearance is different, although the meaning is the same. First, the gasket is put on (it is also in the shape of a horseshoe), then the pressure plate. Next, screw the nuts onto the rods. The nuts are tightened a little with a wrench. THEN nothing complicated.

Turn the sink over and turn the tap. He should stand "dead". There should be no backlash. If there is movement, tighten the fastening.
Sink installation
Now the sink with the mixer installed on it is placed in the prepared place. First, apply silicone sealant around the perimeter of the back of the sink (not acrylic - it quickly turns yellow). Then the sink is installed in place and the mounting bolts are tightened.

Then everything is simple: put it in place, align it with the edges of the table, tighten the fasteners. It is made in the form of petals that attract the sink to the countertop when you tighten the nuts. The sink should stand firmly, without moving.
Connecting hoses and siphon
With a siphon, everything is simple - pull the corrugated hose to the pipe, tighten the nut by hand until it stops. All. Don't use keys - everything is made of plastic.
Connecting the water supply is not much more difficult. You just need to be careful not to confuse the cold water connection location. Its entrance is on the right. After making sure that there is a rubber gasket in the union nut of the flexible line, we bring it to the pipe and tighten the nut as much as possible with our fingers. Then take the key and tighten it one or two turns. Do not pull too hard - you can cut through the gasket and then the connection will leak.
What about tow, winding and paste? When using normal quality hoses, they are not needed. The connection is reliable and sealed without them. It will be possible to rewind a lot if, after a test run, drops of water appear from under the nuts. But this shouldn't be the case. There is no need to just wind tow or fum tape. Extra time and extra pressure on the union nut.
After connecting to the hot pipeline, you can consider that the independent replacement of the faucet in the kitchen is complete. All that remains is to turn on the water and check if everything is working properly and if the connections are leaking. To do this, wipe the joints with a dry cloth and then apply them several times by hand.
A kitchen is one of the rooms in a house or apartment that is used in intensive mode. The kitchen faucet is subject to significant daily stress, so it is advisable to choose a quality product.
After the choice is made, you need to figure out how to install the faucet in the kitchen, fulfilling all the engineering requirements for installation. Read about how to do this correctly in our material.
First you need to decide on the installation method: the mixer can be mounted on a countertop, sink body or on a wall. It is necessary to outline in advance the routes for the location of hot and cold water pipes.
In this case, the connection points must be accessible in case of subsequent repairs or maintenance. If you plan to install a filter, then the place for its installation must be provided in advance.
The mixer is invariably operated in tandem with the sink, so when choosing a product you need to take into account its size and depth, as well as:
- distance between the wall and the hole for the mixer;
- diameter of the hole for the mixer insert;
- drain location points.
In this case, the faucet must be of sufficient length so that the end of the spout, after installation, falls on the center of the sink or sink.
The length of the spout should be equal to half the width of the sink bowl. The most ideal case is when a stream of water hits the drain directly
The height of the spout should be enough so that you can place a tall pan under the tap. But don’t go to extremes and buy a faucet that is too tall. Otherwise, splashes are created that fly outside the sink.
Another important parameter regarding the geometry of the mixer is the rotation angle. If the sink is close to the wall, then it is enough to install a faucet with a rotation angle of up to 90 degrees. If you use a sink with two bowls, then you need to pay attention to models with a rotation angle of 180-360 degrees.
Variety of styles of plumbing fixtures
Having finished with the technical part, you need to decide on the appearance. Today, the choice of faucet styles is so huge that even the most spoiled owner will be able to find a model to suit his taste.
Classic, high-tech, loft, minimalism, chopped and streamlined shapes, chrome, copper or black - you can choose an option for any kitchen.
At the same time, unfortunately, the rule applies: the more expensive, the better - especially true for plumbing fixtures and faucets in particular. There is a limit to everything, but high-quality plumbing fixtures made in Europe are an order of magnitude more expensive than domestically made products.
Determining the optimal design
When choosing, you need to take into account the design features of the mixers. The most practical models are single-lever ones, in which the flow intensity and temperature can be adjusted using one handle. Models with two valves are less practical, but go well with the classic kitchen interior.

A single lever mixer is the most practical option in the kitchen. With one movement of your hand you can adjust both the jet strength and the water temperature
Manufacturers also produce contactless products that are equipped with a motion sensor. When you raise your hands, the sensor is triggered and the mixer starts dispensing water.
For the kitchen, this is also not the most practical option, since you often have to change the temperature and collect water in containers.
Prices for faucets depend on the type of alloy used and the brand of the manufacturer. The cheapest models are made of silumin, have a beautiful appearance, but quickly wear out and become unusable. Silumin and other cheap alloys crumble and crack quite quickly.
Image gallery
Dismantling the old device
If you are making repairs, then first you need to dismantle the old mixer. So, having completed all the preparatory procedures, you need to find the connection points of the mixer with the water pipes. Next you need to find the places where the faucet is attached to the sink.
Using an adjustable wrench, disconnect the flexible connection of the mixer and the pipe. It is important not to forget to replace the container in time, as residual water may leak from the water supply.
If the sink is overhead, then it must be carefully removed. Before doing this, you need to disconnect the lower part of the siphon. Only after this can the sink be removed.
The sink should be turned over so that it is convenient to unscrew the faucet mount. Rust could have accumulated in these places, and the joints could stick to each other, so they should be treated with WD-40.
After waiting 10-15 minutes, you can try to unscrew the connection nuts using an adjustable wrench. First you need to slightly loosen the nuts that are on the threaded pin.
Now, using a screwdriver, you need to unscrew the threaded pin. During this operation, you need to hold the mixer with your hand so that it does not fall.

To loosen the nuts, use wrenches; the threaded pins are easily unscrewed with a screwdriver, then by hand. At the same time, analyze the condition of fasteners and flexible hoses
The mounting hole itself must be cleaned of accumulated dirt. You can recycle your old faucet and get started.
Installing a new appliance in the sink
Before installation in the kitchen, you need to attach the eyeliner to it. It is necessary to wrap tow around all connections - with its help you can seal the system as much as possible.
The tow is wound onto the threads of flexible hoses before connecting them to the mixer. You can add a drop of drying oil to the tow so that when twisting it does not stick to the base of the thread.
The mixer comes with a decorative ring gasket. It is made of metal and has a rubber layer. It is necessary to ensure that the rubber insert is installed exactly in the designated grooves of the ring. Pass the ring through the hose to the base of the faucet.
Now you can install the mixer on the sink by pulling flexible hoses through the mounting hole. It will be useful to have someone from outside to hold the faucet while you screw it to the sink. You need to thread a spacer through the liner.

To cut holes in a metal sink, special devices are used to facilitate and speed up the process. The cutting diameter is selected based on the dimensions of the mounted device
Next, screw the threaded pins through the spacer (pressure plate) into the base of the mixer, and attach nuts to the pins. Now your partner should secure the faucet in position so that you can tighten the nuts using a socket wrench (in most cases this is an 11 wrench).
The mixer has now assumed the position in which it will be used in the future. Before the final efforts to tighten the nuts, you need to make sure that all sealing gaskets have not moved and are in their places.
The sink can be installed in place, and then the connections can be connected to the appropriate fittings in the plumbing system. The pipe connections must be cleaned with sandpaper and a layer of winding applied. This can be linen thread or a roll of waterproof tape sealant.
If you choose a tape, then it must be wound overlapping. If you decide to resort to using flax thread, then you need to lubricate the threads with paste sealant and only then wind the thread.

We connect the underwater hoses to the pipe, and we clamp each connection using an adjustable wrench. Do not use excessive force when clamping to avoid stripping the threads


