“I explained that if it detects boot problems, Windows 7 automatically launches the Startup Repair Tool, which performs diagnostics with little or no user intervention and, in many situations, allows you to repair an unbootable system.
After this article was published, many users shared in the comments their less than satisfactory experiences using Startup Repair in . On the other hand, many wrote on the contrary that it helped them restore normal operation of the system. For those unlucky, I would like to remind you that Startup Repair only solves some problems, including missing and damaged system files.
As I mentioned in the previous article, if Startup Repair fails to fix the problem, it displays a System Recovery Options menu with a list of tools you can use to diagnose and restore your system. In this article, I will tell you how to call this menu yourself and describe each tool presented in it.
Calling the “System Recovery Options” menu
You can access the “System Recovery Options” menu different ways depending on the specific situation.
If Windows still starts to boot, you can try to open the System Recovery Options menu manually with hard drive.
. If Windows doesn't even start to boot, you can call up System Recovery Options by booting your computer from the installation DVD. Windows disk 7.
. If you have a System Repair Disc, boot your computer from it and open the System Recovery Options menu. I'll tell you about creating a system repair disk another time.
Let's say Windows starts loading, but doesn't finish. To access the System Recovery Options menu in this situation, turn off the computer and then turn it on again. After initial boot, when the signal sounds indicating the start Windows boot, press and hold the key.
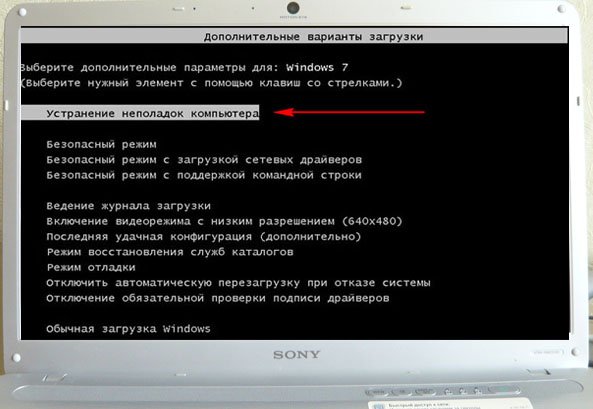
The Advance Boot Options screen appears (Figure A). Select the Repair Your Computer option. As the description at the bottom of the screen suggests, this option displays a list of tools that can be used to diagnose, fix boot problems, and restore the system. To continue, click .
Figure A: Pressing the key when Windows starts to boot brings up the More Boot Options screen.
A message appears telling you that Windows files are downloading, followed by a download screen with a green progress bar. After a while, a dialog box will open asking you to select a keyboard input method (Figure B). Click Next.

Figure B. If you are using English language, just click "Next".
The login window shown in Figure will appear. C. Use an account with administrator rights to log in.

Figure C: Use an account with administrator rights to log in.
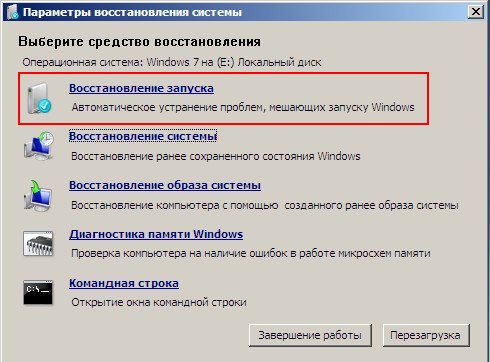
After this, the “System Recovery Options” menu will appear, shown in Fig. D.

Figure D: The System Recovery Options menu lists tools you can use to diagnose, fix boot problems, and perform system recovery.
Options
As you can see, there are five options in the System Recovery Options menu. Let's take a closer look at them.
. "Startup Repair". If this tool does not start automatically when the download fails, it should be used first. Please note that it only fixes some problems, such as missing or corrupt system files. This tool does not correct hardware malfunctions - for example, a hard drive.
. "System Restore" This tool allows you to restore the previous state of Windows system files without affecting the data files in any way – emails, documents, photographs. To provide this capability, the utility constantly monitors the state of the operating system for significant changes, which include the installation of applications, drivers and updates. If such a change is anticipated, the utility automatically creates a restore point - essentially a snapshot of the system state, including important system files and certain registry fragments. System Restore stores several different restore points at once, which allows you to roll back the system to any of the saved states. Therefore, “System Restore” can also be used in case of boot failures - just select the latest restore point.
. “System Image Recovery”. If for some reason System Restore doesn't work, and you have a relatively recent image of the operating system on your hard drive, you can restore Windows from it. The system image includes all system files and settings, programs and user files. Please note that the entire system is being restored from the image, so all current programs, settings and files will be replaced by previous versions saved at the time the system image was created.
. "Windows Memory Diagnostic" If, in addition to boot problems, you encounter application and operating system crashes or STOP errors, you can use the Windows Memory Diagnostic Tool to check your RAM modules for problems. The diagnostic tool writes to memory certain values and then reads them to make sure the data hasn't changed.
. "Command Prompt" When you select this option, various command line utilities are available for diagnosing and restoring your system.
What do you think?
In future articles, I'll talk more about the tools in the System Recovery Options menu. Have you ever used them? Share your experience in the comments!
Let's look at how to start Windows 7 system recovery.
In the second half of 2017, the company plans to officially stop supporting the seventh version of Windows.
In this regard, many users try to find options for solving many errors and problems on their own.
According to the latest data from the company, updates for the OS are released much less frequently, and user support is provided only in really important cases.
The corporation places all emphasis on improvement. Insufficient system support leads to bugs and freezes.
Often, user actions are also the reason why the OS is too slow.
Installing “heavy” games, programs, rebooting RAM and hard drive are the main factors of system failure.
If you experience a sudden deterioration in your computer's performance, you should restore it. After this procedure, all PC functions will be fixed.
There are three basic recovery methods:
Standard utility "Recovery"
- Turn on your PC. Then press the Power key again;
- Open the startup menu by holding down the F8, F12, or Escape key, depending on your PC model;
- After a few seconds, the Windows 7 boot options window will appear;

Rice. 4 – system boot parameters window
- Select an item "Safe mode" by pressing the up and down keys as shown in the figure above;
- Press Enter to perform the action.
After restarting your PC, you will be taken to the Windows 7 desktop, where you can perform a restore via an access point.
Remember! In this mode, it is not possible to use a global network connection. If you need Internet access to set up normal operation of the system, select the item in the additional parameters window "Safe Mode with Networking Support".
Automatic troubleshooting
You can also enable the troubleshooting option through Boot Options. It allows you to reset all errors automatically.
Also, users have the option to enable the latest normal Windows 7 configuration.
After selecting this function, the OS desktop will boot as the last known good copy of the settings.
Follow the instructions:
- When turning on the computer, launch the system power-on options menu by holding and try to start Windows 7;
- If the startup attempt is unsuccessful, return to the system menu again and select "Troubleshooting";
- The operating system will launch a utility to automatically correct all errors. After this, Windows 7 should start in its restored form.

Rice. 5 - Troubleshooting and launching a successful Windows 7 configuration
Recovery via command line
This option is suitable if there is not a single saved restore point on the computer, but you manage to start Windows 7.
Start your PC in safe mode with command line support. This will allow you to open a CMD window and work with basic commands.

Rice. 6 – select OS startup option
After turning on Windows 7, open the Run window and enter the following command in the field. It will run the line.

Rice. 7 – Run window in Windows 7
In the window that opens, type the command shown in the figure and press Enter. After a few minutes, a message indicating that the PC was restored successfully will appear.
Restart it to exit Safe Mode.

Rice. 8 – fixing the system using Command Line
Recovery using a flash drive or disk
Due to fatal errors occurring in Windows 7, users are unable to start the system using Safe Mode.
In this case, you can restore Windows using a boot disk or flash drive.
Bootable media is a removable device (usually a CD or flash drive) onto which an installation copy of the Windows operating system is downloaded.
You can create such media on another PC using programs and other utilities.
If you still have a disk with an official copy of Windows, it can also be used to roll back the system.
Note! The versions of Windows 7 on the boot disk and on the computer must be the same. Otherwise, recovery will not be possible.
Before you start fixing the work using removable media, you should set up a queue - the computer should not load the installed version of Windows 7, but the one located on the drive:
- by pressing the F8 or F12 keys immediately after turning on the PC;
- Go to the Boot tab;
- In the window that opens, find the “Boot Priority” items - each of them means a specific boot order for PC components. Set the type of your bootable media first. In our case, recovery will be carried out from a flash drive, so in the first column “Boot Priority” select “USB Storage”. If you are working with a disk, put the “Hard Drive” component first;

Rice. 9 – selecting the boot order of removable media in the BIOS
- Now, as a result of starting the computer, you will see a window Windows installations Find an item "System Restore" and click on it;

Rice. 10 – recovery from bootable media
- Confirm the action again as shown in the image below:

Rice. 11 – select recovery option
- Click on the “Next” button and select an access point, as described in the first section of the article.

Rice. 12 – launch the standard utility
Using the AVZ utility
AVZ is antivirus software that quickly scans your computer for malware, incorrect settings, and Windows errors.
The application is distributed free of charge and does not require installation. Suitable for use in systems of any capacity.
To perform Windows recovery in this program, just open the “File” tab in the main window. Then click on “System Restore”.

Fig. 13 – main menu in AVZ
In the window that opens, check the boxes for all system options that the program will work with. Click on the "Run" button.
Doing them will increase the likelihood uninterrupted operation Windows 7 after the application has finished running.
Fixing your network, hard drive, search, and startup settings at the same time is the best recovery option for your operating system.

Fig. 14 – selecting system settings in AVZ
Error 0*000000 occurs
Sometimes, during recovery or immediately after the operation is completed, an error with code 0*000000 may occur.
Its different variations can be supplemented by other identifiers, for example, 0*c0000034 or 0*0000007b.

Fig. 15 – example of an error occurrence
The occurrence of a problem informs the user that the system was unable to access the read procedure from the bootable media.
Since the error appeared in an already installed system immediately after it was restored, we can say that its cause is a problem with the drivers.
Most likely, after the recovery procedure, the operating mode of the system disk was changed from IDE to AHCI, so the existing drivers were not suitable for booting the OS.
You can solve the problem by disabling it via:
- Turn off your computer and open the BIOS menu;
- Go to the CMOS settings tab and select the SATA serial interface configuration item, as shown in the figure below;
- Press Enter and select the IDE option in the pop-up window;
- Save the settings, exit the BIOS and restart the computer.

In this video I will show you how to launch the System Restore function.
The problem of unstable operation of Windows 7 is often associated with corruption or deletion of system files, for example, after reinstalling or installing an infected program. This is not the most difficult problem - there are many ways to restore data using standard OS tools or manually. We will consider the simplest and most effective options below.
Rollback to last stable state
By default, in all Windows, protection is active for system partitions. It is responsible for creating special checkpoints containing configuration information and system files of the environment before modifying it - installing applications, drivers and updates. Moreover, restore points are created without such a reason by the system at a certain frequency or by the user himself.
If problems began to appear relatively recently, and you remember the approximate date of their appearance, then the best solution is to roll back the OS to the moment when no failures were observed during the operation of the OS.
In a production environment this is very easy to do:

All that remains is to reboot, after which the damaged system files will be replaced with previous working versions.
If windows won't boot
Even if the damage to system data is so serious that the OS cannot boot on its own, you can use restore points:

The corresponding control point selection utility will launch, which you need to work with in the manner described earlier.
If pressing F8 does not open the boot options window, you will only be able to get into the recovery environment if you use the boot/installation disk.
Using the standard SFC utility
This application checks and repairs basic OS system files. It can also be run on the command line from a boot disk, from the boot options window after pressing F8, and from a running system. The last option is the simplest:


Once the operation is complete, SFC will notify you of the results - the corrupted data should be detected and corrected.
Recovering data manually
Sometimes the methods described above cannot fix the problem. For example, when updating DirectX from distributions that come with various applications, DLLs are often lost. Therefore, always try to update DirectX from the office. Microsoft website, and if trouble has already happened, then if a new version is available, all DLLs will be updated automatically after installing a fresh component package from the website http://www.microsoft.com/ru-ru/download/confirmation.aspx?id=35.
If there is no new version on the specified page, then any DLL from another source can be transferred to your system yourself. Libraries are stored in the following directories:
- for windows 7×32 - in the folder C:\windows\System32;
- for windows 7x64 - in the C:\windows\SysWOW64 directory.
If, when you launch an application, a window appears informing you that a DLL is missing, and the installer from the Microsoft website reports that you have the latest version of the libraries on your system and does not update the components, then you can simply use the search engine. Find DLLs on the Internet and move them to the specified folders.
Not only DLLs, but also any damaged system files can be extracted from the Windows 7 installation distribution. To do this, you just need to know which files are damaged. Often the OS itself informs the user about the absence of a DLL or about an application error, for example, Explorer.exe. You can get the information yourself.
Let's find out what system information is faulty
To do this, you will again need the command line; we have already described how to open it. Write the following command here:
indstr /N:"" %windir%\Logs\CBS\CBS.log >"%userprofile%\Desktop\sfcdetails.txt", where N is the drive letter.
Press Enter, after which sfcdetails.txt will be created on the desktop, which you need to open and carefully review. Its content will be similar to the image below.
Here we see that the Accessibility.dll library is damaged. It is this that you will need to find on the Internet or extract it yourself from the existing Windows 7 distribution to carry out the recovery.
Extracting OS components from the distribution
In addition to the installation disk, you will need a small free 7-zip application. With its help, we will work with the install.wim image located in the sources directory. The order is as follows:

All that remains is to copy them to the desired folder or flash drive. You can replace damaged data with them using installation/bootable media or LiveCD.
Replacing damaged files with new ones
To load the environment, we will use the same installation drive from which we took the data we needed:

These steps allow you to get into a fully functional explorer. Here you first need to specify that the program displays all file types. This is done below in the drop-down list. Next, all that remains is to transfer the copied files from the flash drive or from another folder to the place of the damaged ones and reboot. In this way, without reinstallation, you can fix problems caused by damaged system data.
recoverit.ru
How to restore windows 7 without reinstalling
All owners of desktop computers or laptops, sooner or later have to reinstall the OS, be it Windows 7 or any other modification. There are many reasons for damage to the operating system (malware infection, incorrect installation of drivers, accidental deletion of system data, etc.). However, if information that is important to you is saved in the system partition of the PC (for example, on the desktop), after the demolition of the operating system it will also be deleted. To prevent this, instead of reinstalling, you can perform a Windows restore.
Ways to restore Windows 7 without reinstalling
The developers of this operating system took care of its reliability, equipping the product with many protective functions, among which the most useful is the recovery procedure. This software tool allows you to restore the functionality of the OS without completely reinstalling it.
There are several ways to initialize the Windows reanimation process:
- using last known known configuration;
- using the Chkdsk program;
- via a restore point;
- via BISO.
To complete the task, you do not have to look for any software or use additional devices.
The only thing you need to prepare is a DVD with Windows 7 OS of the exact build that was installed on your computer. Perfect option– using the same disk.
Restoring the last good configuration
Every time you exit the system, all the important data necessary for the launch and operation of the operating system is entered into the registry. It is this information that the recovery procedure uses.
To activate it you need:
- Remove all additional storage devices from the computer (CDs, DVDs, flash drives, memory cards, floppy disks), and then restart it.
- While Windows is loading, hold down the F8 key. This will take you to the Additional Download Methods window.
- Select Last Known Good Configuration.
If after completing the above steps the system boots, it is recommended that all important information saved in the system partition (“My Documents”, drive C, desktop) be copied to another drive. After this, check your PC for malware and, if possible, perform a full system diagnostic.
Using this recovery procedure, you will not be able to recover lost personal data (music, videos, etc.), since it only works with system files. To restore such information, you need to use additional programs.
Restoring Windows using the Chkdsk application
Chkdsk (from the English “check disk”) is a program built into the operating system that searches for damaged system files on the hard drive and restores them.
One more useful property This tool is to diagnose storage media for mechanical damage to sectors and close access to them, thereby speeding up the operation of the system.
There are two ways to initialize Chkdsk:
- via graphical interface;
- from the command line.
In the first case it is necessary:


To run Chkdsk from the command line:

After this, the Windows system will be restarted and diagnosed for damage.
Applying a restore point
A restore point is an OS element that stores a copy of system files, drivers and installed programs recorded in certain time. In Windows, such points are created automatically at regular intervals, as well as after installing and updating programs.
To use a restore point, you need to:

Restoring a Windows system via BIOS
If it is impossible to start the OS, restoring using the methods described above will not work. In this case, you can use the BIOS to resuscitate Windows without reinstalling it.
The procedure will be as follows:


All available methods for restoring a Windows system do not provide a complete guarantee of a successful outcome. Therefore, if one method does not work, you need to use another.
recoverit.ru
Recovering deleted or corrupted Windows XP and Windows 7 system files
There are times when you need to restore damaged or deleted Windows XP system files. System files have every chance of being deleted, corrupted, or replaced with infected files as a result, for example, of viruses. There are often cases of defective system files when the computer is turned off incorrectly (as an option, when the lights are turned off) due to errors in the file system.
Below you will get the answer to the question: How to restore damaged system files without reinstalling the Operating System.
The method is suitable for cases where it is known which system files will need to be returned.
If the PC stops booting after an incorrect shutdown (power outage, turning off with a button, unplugging the power cord from the outlet), you first need to check the hard drive for logical errors.
The recovery process consists of copying the required system files from the Windows XP installation disk. The windows distribution contains all the system files. They are located in the I386 folder. All necessary files on the installation disk are written in compressed form and have an extension of the form .dl_ .ex_, etc.. I.e. the last character is replaced with an underscore.
We will need to unpack the files removed from the system from the windows installation disk into the folder where they should be present. If you do not have a windows distribution, you can download the archive with the I386 folder for 32-bit windows versions XP.
To return system files you need to boot from a bootable CD, for example ERD Commander. You can download the disk image here. You can burn a disk image using free program ISO Burner (you can download it from this link)
Let's look at how to unpack system files from a Windows installation disk using the example of restoring the file C:\windows\System32\userinit.exe, which is often replaced with banners blocking Windows. The process of restoring damaged system files from the installation disk is not fundamentally different for other files. The main thing is to know in which folder this or that file is located.
Boot from the ERD Commander disk. Select download ERD Commander 5.0 for windows XP. In the window that appears at the end of the download, select the path to the installed Windows OS and click OK.
Open My Computer. Insert the windows installation CD. From the I386 folder, copy the required system files with the extension dl_ or ex_ to the folder where they should be present in the installed system. For us, this is the USERINIT.EX_ file. Copy USERINIT.EX_ from the I386 folder to the C:\windows\System32\ folder. To achieve the desired result, right-click on the USERINIT.EX_ file and select Copy to from the context menu.

In the window that appears, select the path C:\windows\System32 and click OK.

After the file is copied to the system folder, you will need to unpack it. Unpacking system files with the dl_ or ex_ extension from the windows installation disk is done using the expand command. The command syntax is: expand [source file] [target file] To execute the command, you will need to launch the Command Prompt. From the Start menu, select Run. In the window that appears, enter the cmd command and press Enter.
In the command line window, enter the command to unpack our file: expand c:\windows\system32\userinit.ex_ c:\windows\system32\userinit.exe and press Enter.

Unpacking will be completed, as indicated by the text: “c:\windows\system32\userinit.ex_: 11863 bytes expanded to 26624 bytes”. System file recovery was successful. Now you can restart your PC.
Any other windows system file can be restored in the same way.
How to restore corrupted Windows 7 system files without reinstalling the system.
Now let's look at how to restore system files in Windows 7.
We boot from the "ERD-Commander" disk (in the menu on the disk when loading, you need to select the version for Windows 7) Download the disk image here.
In the network settings window, select “Skip” and confirm the reassignment of disks. Next, select the path to the windows system folder.
Launch the MSDaRT recovery tools.

Select "System File Checker" from the menu


Select the item “Scan and request before fixing” - click “Next”

As a result, the process of searching for damaged or deleted system systems will begin. windows files 7. It can last about 5 minutes. When the process is completed, a list of damaged or deleted files windows. We tick the files that we want to restore and click “Next”.

The process of restoring Windows 7 system files will begin, after which the recovery results window will appear. Click "Next" and in the next window - "Done".

Keep in mind!
You need to be careful when selecting files for recovery, especially when using a pirated version or a Windows build.
Perhaps certain system files will be changed in it so that Windows does not ask for activation. The recovery tool may consider these files corrupted and replace them with the original ones, which is why Windows may display a message during its boot process about an unlicensed version of your Operating System. In case of restoring system files after removing the banner, select files to restore from the table below.
Windows system files and the folders in which they should be located:
Here are certain Windows system files, as well as the folders in which they should be located. By the way, if you find a certain file, but in a different folder, most likely it is a virus! (except for the c:\windows\system32\dllcache folder).
| File | Folder |
| explorer.exe | c:\windows |
| iexplorer.exe | c:\windows |
| regedit.exe | c:\windows |
| notepad.exe | c:\windows |
| userinit.exe | c:\windows\system32 |
| taskmgr.exe | c:\windows\system32 |
| taskman.exe | c:\windows\system32 |
| cmd.exe | c:\windows\system32 |
| logonui.exe | c:\windows\system32 |
| winlogon.exe | c:\windows\system32 |
kampc-help.ru
How to restore Windows 7/8/8.1 system files
 Hello, friends! Recovering Windows 7 or Windows 8/8.1 system files most interesting topic. Especially if the operating system starts to fail, but we don’t have a recovery image and we forgot to turn on system protection so that recovery points can be created. In this case, we will not be able to restore the system from the image, we will not be able to roll back windows to the created restore point, and we are also too lazy to reinstall the system, since this will take the whole day. And right here we have another chance to return Windows to normal - try to restore system files. In this article I will try to fully cover the topic so that we can revive our computer in any situation.
Recovering system files on a busy system
If our computer somehow turns on, then we do the following (if it doesn’t turn on, see section 2 of this article).
Open the Start menu. In the search field we write “Com”. On the “Command Prompt” element, right-click and select “Run as administrator”.
In the command line that opens, write:
We are waiting a little...
If your system is fine, you will see the following image.
If your windows was broken, you will see the following.
System files were successfully restored. We reboot and immediately turn on system protection to create restore points so that next time we can simply roll back the state of the computer to a couple of days ago and that’s it.
It happens that when scanning the system, the sfc.exe utility found damaged files, but could not fix them. In this case, I would restore system files in Safe Mode. If the same thing happens in safe mode, read the last paragraph 4 of this article.
If your computer does not boot at all, as discussed at the very beginning of the article, then read the next paragraph.
Recovering system files in the recovery environment
If our computer does not want to boot at all, then we use the recovery environment. You can load into it:
- Pressing F8 several times when turning on the computer
- Booting from a boot (installation) disk or flash drive
The first option will work if we have a boot partition that the system created when partitioning the disk when we installed the system. Boot partition size:
- windows 7 - 100 MB.
- windows 8 - 350 MB.
In any case, try pressing F8 several times during boot. A window should appear with additional download options. Select Troubleshoot computer problems.
In the next window, select the keyboard input method. Select the language in which your administrator password is set (if there is no password, you can immediately click Next >).
Select a user with administrative rights and enter a password if you have one. If there is no password, just click OK.
Select the command line.
If you are unable to enter the recovery environment using the F8 key, you will need to boot from the installation (bootable) flash drive or disk. How to boot from a flash drive - here. You can boot from disk in the same way. Only in this case you need to put the DVD-RW (optical disc reader) first in the boot priority.
I like to boot from removable media using the boot menu. On ASUS motherboards it is usually also called by the F8 key.
After booting from a flash drive or disk, I saw the following picture. I choose windows Setup - Installing windows.
Select System Restore.
We wait until all installed windows are found.
We choose the one that does not turn on for us. And here CAREFULLY! We remember the letter that the recovery environment assigned to your system (in the Folder column). I have this D.
Select Command Line.
Enter the command:
sfc /scannow /offbootdir=D:\ /offwindir=D:\windows
Instead of D, you substitute your letter. Press Enter and wait for the scan to complete
The virtual machine from which the screenshot above was taken had a blue screen, so I was not surprised that system files were found and restored.
How to find out the drive letter with windows installed
If you were able to use the F8 key to open the “Advanced boot options” window and select “Troubleshoot computer problems,” then we need to find out the drive letter where Windows is installed, which was assigned by the recovery environment. This can be done in two ways
1. Call the notepad with the command
In Notepad, open the File menu and select Open...
On the left, click Computer and in front of you will be disks with letters.
You can go to the disk and make sure what and where.
2. Use the DISKPART utility
On the command line enter:
diskpart - call the utility for working with disks.
list disk - view the list of disks.
select disk - select the hard drive I need.
detail disk - call up information about this disk.
For windows 8/8.1
If the sfc utility was unable to restore damaged system files, then you need to try to restore the storage of these system files. The place where copies of working system files should be located. As I understand it, it is located at C:\windows\WinSxS. That is, we must first fix the file storage, and then use the “SFC / Scannow” command to restore the windows system files.
Restoring storage using windows update
1. Launch windows PowerShell with administrator rights. To do this, open the Start menu or home screen and click on the “Search” icon. In the search box we write “PowerShell”. Right-click on “Windows PowerShell” and select “Run as administrator” or “Run as administrator”.
2. In the window that opens, write
Dism /Online /Cleanup-Image /RestoreHealth
and wait. If the storage is intact or it was restored using Windows Update, you will see the following picture.
If Image Health State: Healthy - everything is fine. Reboot the computer and try SFC /SCANNOW again.
Restoring storage using an image
If we have problems with Windows Update, then this method will do.
1. Download the original Windows 8/8.1 image of the same bit size as your system. How to find out the bit capacity of the installed system - here.
2. Connect or mount the downloaded image. Right-click on the image and select “Connect” or “Mount”.
3. In the command line with administrator rights, we look at what editions there are in the image with the command
Dism /Get-WimInfo /WimFile:F:\sources\install.wim
I have 2 editions in my image. It’s hard to understand which one I need based on these distinctive signs. Let's use the first one. If it doesn’t work, the second one.
4. Launch Windows PowerShell with administrator rights and set the command
Repair-windowsImage -Online -RestoreHealth -Source F:\sources\install.wim:1
where F is the drive letter to which we connected the image, 1 is the Windows edition number in the image.
Recovering system files manually
If using the sfc utility it was not possible to recover damaged files, you need to try to do it manually. In this case, you need to additionally run the command
findstr /c:"" %windir%\Logs\CBS\CBS.log >"%userprofile%\Desktop\sfcdetails.txt"
Findstr/c: ""%Windir%\Logs\CBS\cbs.log>sfcdetails.txt
and carefully examine the sfcdetails.txt file on your desktop or in %windir%\Logs\CBS\.
It should be something similar to the picture below.
After the name of the damaged file is known (Accessibility.dll), we look for it on another computer with the same system as yours. If this is not an option, then I would download the original windows image and install it on the virtual machine. I found the file I needed and copied it to a bootable or installation flash drive. Then, from this installation flash drive, I booted into the recovery environment and launched the command line. From the command line I would open notepad. I opened the menu File > Open - and now I have an almost full-fledged explorer. We copy and replace the working file from the flash drive, reboot and everything should work.
If the option of installing a virtual machine does not suit you, then you can include the install.wim file in the folder. Then go to this folder and copy the necessary files.
1. Create a folder. For example, “Win8.1Pro” in the root of drive D.
2. Copy the install.wim file to the root of drive D.
3. Mount the install.wim file into the created folder.
Dism /Mount-Wim /Index:1 /WimFile:D:\install.wim /MountDir:D:\Win8.1Pro
Go to the created folder and copy the necessary files.
Disable the image
Dism /Unmount-Wim /MountDir:D:\Win8.1Pro /Discard
Conclusion
This is how I will try to restore system files in Windows 7/8/8.1. Write questions and suggestions in the comments. Thank you for sharing the article on in social networks. All the best!
Best regards, Anton Dyachenko
YouPK.ru
How to restore system files in Windows 7
What to do when for some reason system files have sunk into oblivion and the computer cannot work normally? There is no need to worry, as the situation can be corrected.
Reasons for disappearing system files
It often happens that Windows system files disappear. Their absence interferes with the normal operation of the system or, even worse, prevents Windows from starting. The reasons for this may be different:
- the system file was deleted by a virus or blocked by an antivirus;
- accidentally, due to the fault of the computer user himself;
- due to Windows updates (if updates occur constantly over a long time, they begin to block each other).
Of course, you can go to extreme measures and reinstall the system. But this is not a solution if there are working documents saved on the desktop or folders on the system drive that cannot be lost, because after reinstallation they will definitely disappear. Before doing this, you should still try to restore system files for Windows 7.
How viruses work
It often happens that a virus got on the computer, after which the system file became damaged and was deleted. In this case, you need to look at the antivirus logs. It will indicate how the file was deleted, when and what virus it was infected with.
Sometimes it happens that the antivirus itself blocks important data after updating the OS. In this case, you need to go to the “Quarantine” section of the antivirus and find the missing files, then restore them and add them to the white list or change the antivirus program.
Recuva
On Windows 7, system file recovery can be performed by a third-party program, for example, Recuva. It is completely free and easy to use even for those who will be doing it for the first time. Download it and install it. Having launched it, the first thing you need to do is switch to advanced mode (the button at the top right), then select the directory to scan (windows folder) and start scanning.

After the system file check is completed, files with multi-colored circles next to them will appear (green - excellent condition, yellow - damaged, red - cannot be recovered). If the check shows that the desired object is in excellent condition, you can easily restore it by selecting the checkbox and clicking on “Restore”.
Let's rollback
A rollback restores the operating system using a checkpoint that was created before the error occurred. The operating algorithm is as follows: Start / All Programs / Accessories / System Tools / System Restore. Select an OS restore point that was created before the loss of important data. We launch a rollback, after which the Windows system files and folders will be restored. However installed programs will be deleted afterwards. You can view the estimated losses by clicking on the “Search for affected programs” button.

Troubleshooting
If it is impossible to restore system files on Windows 7 using a third-party program and a rollback cannot be done, you need to scan your computer for damaged and missing data. The command line will help in this matter.
Open it as an administrator. You can do this in several ways:
- Start / All Programs / Accessories, right mouse button on cmd (command line) - “Run as administrator”.
- Go to the system drive, windows folder, System32, right mouse button on cmd - “Run as administrator”.
- In the Start search, enter cmd and press Shift+Ctrl+Enter.
In the window that appears, write sfc /scannow, after which the Windows 7 system files will be checked for integrity and restored if some of them malfunction.

After recovery, you need to make a point to restore the OS so that next time you can rollback it, rather than restore individual data. The algorithm is as follows: open the “Properties” section in “My Computer”, on the right side select the “System Protection” section. In the “Protection Settings” section on the system drive, protection must be enabled. If this is not the case, select it, click “Configure” and put a dot next to “Restore system settings and previous versions of files”. We choose a place for disk space (1.5-2 GB is enough). Click OK. Next, click “Create” and give it a name.

Now you can restore system files on Windows 7.
Windows 7 won't boot, system file recovery
While loading the OS, you need to constantly press F8 until the list and the words “Last Known Good Configuration” appear. Click on it, after which the system should start from the moment when Windows successfully booted up the last time. If that doesn’t work, select “Troubleshoot computer problems.” In the list, click on “Startup Repair”. Windows 7 system files will begin checking for errors and faulty data, after which we restore them by clicking “Fix and restart”.

Also, if a restore point was previously created, you can return the OS to its previous state using a rollback.
Boot disk
If the operating system does not boot due to data loss, you can return it to normal using a boot disk or flash drive. We insert the disk or flash drive into the computer and reboot it. Next, the bootable media needs to be set to first place as a priority. You can do it like this:
- In BIOS settings. Go to the BIOS (F2, F11 or del key) and look for Boot Manager. There we set the flash drive or disk drive to first place as a priority. If the flash drive is not displayed, you need to activate USB support in the settings. These settings look different for each BIOS version.
- Before starting the OS, press the boot menu key (F8, F11 or F12), after which Boot Manager will appear with a list of drives, from which we select the one we need. If bootable Windows is on a flash drive and it is not displayed, you need to activate USB support in the BIOS settings.

If selected required drive, the Windows 7 installation will start. After selecting the language, click “Next”, and then select “System Restore” at the bottom left side. In the window that appears, select “Startup Repair” or “System Restore”. The next steps are already familiar.
How to restore Windows 7 system on the laptop, when loading, a black screen appears, the recovery environment does not work, I deleted all the hidden partitions, there is no original disk. I spent a lot of time, tell me what to do now, or at least how to insure myself against such situations in the future, preferably without using paid data backup programs. Ilya.
How to restore Windows 7 system
Unfortunately, there are many reasons for this problem, ranging from incorrectly written drivers, harmful effects of a virus, file system errors and ending with our erroneous actions when working with a computer. There is no need to be afraid of such problems, you need to learn how to deal with them effectively.
Let's think how to restore windows 7 system, and we will also insure ourselves in the future against possible troubles using backup and recovery tools built into the operating system. We will learn how to restore Windows 7 without using third-party backup programs, even when System Recovery Options do not load and the F-8 button is useless.
- Friends, if our article does not help you, then check out others on this topic, for example: in it you will learn how to restore a non-bootable system using various command line utilities, the first is Bootrec.exe with the commands /FixMbr and /FixBoot or the utility bootsect /NT60 SYS, as well as Bootrec.exe with the /RebuildBcd parameter, these utilities can be launched from the recovery environment or from the Windows 7 recovery disk. Another article will teach you how to restore a damaged or deleted bootloader bootmgr. The article will show you how to restore your operating system when system recovery is disabled and much more.
- If Windows 7 freezes on boot or suddenly reboots, or may suddenly show a blue screen with an error, then all these problems may be due to numerous file system errors. How to fix the situation even when the operating system does not boot due to these errors is written in this article.
- Well, eight articles from the section will give you a detailed understanding of all the built-in recovery tools in Windows 7: restore points, previous versions of files, creating a system image and a recovery disk, and so on. So, let's begin.
Windows 7 has quite a powerful and good tool in its arsenal -> Recovery environment, which is created automatically when installing Windows 7 in a hidden partition and contains five other tools that solve numerous problems and problems.
- Note: If you learn how to use Windows 7 recovery tools correctly, and this is not difficult, then you can do without additional and paid data backup programs.
You can launch the recovery tool by pressing the F-8 button on the keyboard immediately after starting the computer. After this, the menu Additional boot options will open in front of you: Troubleshoot your computer, then Safe Mode, Safe Mode with loading network drivers, etc.
The first thing to do is apply Startup recovery(Automatically fix problems that prevent Windows from starting)
Required digression: After pressing the F-8 button when booting the computer, you may not have the > item, but only Safe Mode and so on, the question arises why.
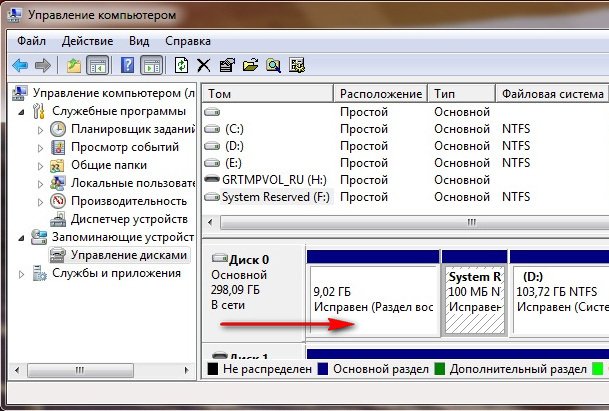
When installing Windows 7, a recovery environment partition is created automatically and is located in the root of the drive (C:) in the Recovery folder. You can also see in the Disk Management window - a separate, hidden partition of the hard drive, its volume is only 100 MB, it is used to store boot configuration files (BCD) and the system bootloader (bootmgr file).
You can see it under Computer->Management->Disk Management. Under no circumstances should you delete this partition (many people delete it out of ignorance), otherwise you will not be able to start the recovery environment, that is, the item Troubleshooting your computer you won’t, and in more severe cases you simply won’t boot the system.

In the lower screenshot you can see another hidden partition, with a capacity of 9.02 GB, this is a hidden recovery partition with factory settings on my laptop, yours may be larger or smaller. It’s also better not to delete it; if necessary, you can always restore Windows 7 from it.
What should you do if you do not have a partition with a recovery environment and when you press the F-8 button in the Additional boot options menu, the Troubleshooting computer option does not appear? How then to restore the Windows 7 system??
An installation disk with the Windows 7 operating system can help here. You can run the recovery tool by booting from the original Windows 7 installation disk by selecting the item at the very beginning System Restore. If you don’t have an installation disk, then you can use it (you can make it in any running Windows 7) in five minutes, then you can also boot from it and do the same.


So we finally got to the System Recovery Options, either using the F-8 button and the Troubleshooting item, or the Windows 7 installation disk or the Windows 7 Recovery Disk.
In the System Restore Tools Selection menu, select the first one:
Startup recovery-> there will be an analysis of faults that interfere with the normal loading of Windows 7 and their further correction for the normal loading and functioning of the operating system. During the process, we may be warned that problems have been detected in the boot parameters, click Fix and restart.


System Restore->using this function, we can, if we have it enabled, roll back to the time when our Windows 7 worked and loaded perfectly, everything is simple here.


->I personally use this tool; if used skillfully, it can replace paid data backup programs. If you are interested, read on.

What's good about it? It will help when you don't have the original Windows 7 installation disk and you've deleted the hidden partition with your laptop's factory settings, but that's not all.
Sometimes there are situations when, for various reasons or due to the actions of a virus, you will not be able to load the operating system at all, or many people ask How to restore Windows 7 system even if the menu with Additional options Downloads will also be unavailable. Should I reinstall the operating system again?
Therefore, immediately after installing Windows 7 on your laptop or computer, we create using this function-> Restoring a system image, an archived image of our Windows 7 on the hard drive, we take care of it. You must create a Windows 7 Recovery Disk (read below), it will help you use the System Image if the Advanced Boot Options menu does not load.
Let's go to Start -> Control Panel->Archiving computer data.

Choose Creating a system image

Next, select Local disk on which we will store the system archive. In my case, Local disk (E:), if you have several hard drives in the system unit, then of course it is better to place the backup on the hard drive where the operating system is not installed.


Note: You may notice that I have two operating systems installed on my laptop, so the archiving program selected two Local disks.

Click Archive and the process of creating an archive with our Windows 7 will begin.
Created, it will look like this.

Now, if necessary, you can deploy the archive with Windows 7 to your computer in 20-30 minutes. It would be better if you additionally copy the archive with the system onto a portable hard drive, this will doubly protect you.
Let's imagine that we can't start Windows 7 and deploy the backup we created, let's do it together.
Let's launch Windows 7 Recovery Tool, by pressing the F-8 button on the keyboard immediately after starting the computer. The Advanced boot options menu opens, select Troubleshoot your computer.

Restoring a system image


Use the latest available system image
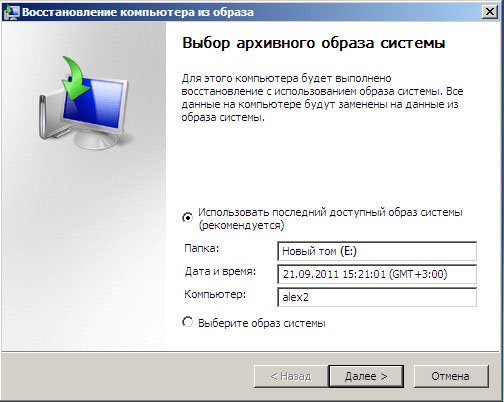

Of course, all our data on the Local Disk, where the operating system is now being restored, will be deleted, so you can first boot from any Live CD and copy what you need.
How else can you restore your Windows 7 system? Of course, using the Windows 7 Recovery Disk. Let's create Recovery disk, which can be used to boot the computer, it will contain recovery tools that can be used to repair Windows 7 boot problems, as well as restore the operating system from the backup copy that we created in advance.
Important: The bitness of the system is important for the recovery disk, you can use a 32-bit recovery disk for any 32-bit Windows 7, and a 64-bit recovery disk for any 64-bit Windows 7.
Let's go again Backing up computer data
Create a system repair disk, insert the DVD into the drive, press

Create disk


When the Windows 7 Bootable Recovery Disk is ready, put it in a safe place.
To restore Windows 7 from a Recovery Disk, you basically don’t need any working operating system at all. You will only need to change the boot priority to the drive in the BIOS of your computer, insert the recovery disk into it and restore your Windows 7 using the archive. Many here can draw an analogy with data backup programs and this is correct, they work on the same principle, only Of course, their functionality is more convenient.
- If you don’t know how to change the boot priority in the BIOS, read our articles and
Recovering Windows 7 from a Recovery Disk. I show you how to do it. Let's say we're in trouble, we can't start Windows 7, when we press F-8 on the keyboard immediately after starting the computer, nothing happens. We cannot get to the menu with Additional boot options and an error message is displayed. In this case, the system archive on the hard drive is not available to us. This is exactly the kind of trouble that happened to our reader Ilya, who wrote us a letter asking for help.
In this situation, many people reinstall Windows 7 from scratch, but not you and me, because we have System Recovery Disk.
We insert it into the drive and reboot, set the BIOS to boot from the drive, as I said, the disk is bootable, the System Recovery Options program starts.
Press Enter until the prompt to boot from the disk disappears.
The Windows operating system has, among other things, a self-healing function. It will come in very handy in cases where changes in the configuration of the computer or the system itself negatively affect the operation, the reasons for which may be incorrect operation of certain drivers and programs, virus software, etc. Let’s take a closer look at how this function works and how to perform a recovery using it Windows.
The Windows recovery function involves rolling back (reverting) to a specific system configuration. You can enable/disable system recovery and configure it in “System Properties” (“System Protection” tab). In the same menu, you can manually create a new recovery point, and in the settings window there is a special button for deleting all saved recovery configurations. There is also a system restore button here. This is the easiest way. It will automatically suggest restoring to the last point, but you can manually select another saved configuration. After Windows recovery is confirmed, the system will roll back and the computer will restart. In cases where problems arise with the operation of Windows and it is not possible to use the method described above, try booting the system in safe mode (this is a lightweight option for starting the OS, without additional services and programs). To do this, at the very beginning of the launch, press the F8 key and select the appropriate option from the proposed ones. After loading, we try recovery as described in P.2.


By following the instructions above, you can restore Windows to the settings at which the system worked correctly. We recommend checking whether the system protection service is enabled, which allows you to create restore points, and manually create at least one such point, which can later be used to restore the system in order to avoid a complete reinstallation of the OS in the event of critical problems in its operation.


