One of the most important skills for any tourist is knowing how to navigate with a compass. It is not enough to have a compass with you; you need to understand well how to use it and how to determine the desired direction using a compass.
How does a compass work?
The compass is an ancient invention and its structure is quite simple.
The main part of the compass is magnetized arrow. It always strives to position itself along the magnetic meridian in the north-south direction. It also reacts to large accumulations of metal, live wires, deposits of magnetic ores in the ground and can deviate very strongly from the original value.
Around the compass needle there is a moving scale with divisions called limbo. It divides the circle into 360 degrees. Scale divisions most often correspond to 2⁰. The first division, also known as 360⁰, is indicated by the letter “ N", that is, Nord - north.
South is indicated by the letter " S» - Suid (south)
West on the left - " W» - West (west)
East on the right - " E» – East (ost)
Different compasses have additional aids for aiming and determining azimuths. 
Types of tourist compasses
To begin with, let's figure out what types of tourist compasses there are.
First of all, let’s remember the old and well-known Adrianov’s compass from the Soviet era. By the way, Adrianov is a Russian military cartographer who, in fact, designed an illuminated compass (phosphorus-based) back in 1907.
The advantages of this instrument are that the arrow indicator, the cardinal direction, and the front sight indicator are illuminated in the dark. In addition, it is quite reliable and is very popular among tourists in post-Soviet countries. The downside to using it is that the magnetic needle is unstable when moving.
There is also an opinion that some compasses of this type are radioactive. This applies to old compasses that used radioactive elements for illumination.
Liquid compasses are the most popular in orienteering. Due to the fact that its internal volume is filled with liquid (kerosene, etc.), the arrow does not fluctuate when walking or running. This is quite convenient when you need to quickly navigate and reach objects.
Tablet compasses are also popular among tourists. They are convenient because they have a ruler with a pointer and a magnifying glass. This helps you navigate the map more accurately.
In addition, you can select a keychain compass, wrist compasses, and a finger compass.
But the most important thing when choosing this item, in addition to its visual appeal and ease of use, is to make sure of its functional suitability and serviceability.
Since the market is oversaturated with goods from China, it is necessary to check the compass as follows before purchasing. First, we check whether the direction of the magnetic needle corresponds to geographic north. If everything is in order with this, we bring a metal object, for example, a knife, to the compass. The arrow should deviate from its original position. Then we take the item. After this, the arrow should return to its original position without visible deviations.
All tourist compasses use the property of a magnetized needle to be located along the magnetic lines of force of the Earth. At the same time, for ultra-precise orientation (for example, on ships), an allowance is made for the fact that the Earth’s magnetic lines do not completely coincide with the geographic meridians. And accordingly, the angle between the geographic and magnetic meridians is calculated.
How to navigate with a compass - the simple way
- The blue end of the arrow will indicate the north, the red end will indicate the south... If you stand facing where the blue end of the arrow is pointing, then to your left will be the west, to your right - the east... But the main thing is to know the direction (azimuth) in which you should go, otherwise compass is useless...
- Just look at natural landmarks. And then about the compass. You don’t know where you’ll come from or in which direction you’ll come. But you always need a compass!

In specialized stores that sell accessories for fishermen, hunters, tourists or athletes, you can find various modifications of magnetic compasses. In order to find your way in an unfamiliar place, the simplest, cheapest device is enough. It’s hardly worth spending money on a more “sophisticated” device, given that all its capabilities (functionality) will not be implemented in practice anyway. Probably, in this regard, the only useful recommendation is to pay attention to “liquid” compass models. A special mixture is pumped inside their flask, which “quenches” the vibrations of the needle. Such modifications of the device are more convenient in that they allow you to navigate without stopping directly while moving. For a tourist traveling on foot, such a compass is preferable. There are several ways to check the functionality of the device. The simplest of them is to bring the compass closer to any metal product (stained glass frame, door handle, etc.) right in the store. The arrow should not just deviate, but orient itself smoothly, without jerking. This sometimes happens with cheap models due to improper mounting on the axle. Those who use a compass to “reference” a map to the terrain should remember such a calculation parameter as magnetic declination. The device shows the magnetic pole, but for all maps the geographic pole matters. In most cases, this error in orientation is not taken into account, but if maximum accuracy in determining coordinates is required, it will have to be taken into account. Relevant reference data is indicated on each sheet of the map.
It is quite easy to get lost in the forest or in unfamiliar places. In fact, sometimes this happens even within the city. A compass will help you find your way out without a map if you get lost. But not everyone knows how to learn how to properly use this device on the ground, because brief instructions for use do not always come with the compass.
In order to have basic survival and navigation skills, it is worth learning the rules for using a compass at home, in an apartment, and only after that go into the forests and test your strength in real conditions.
Nowadays it is not at all necessary to buy a large tourist compass. Just download it from mobile phone Moreover, the operating system does not matter - it can be Android or iOS. If we talk about iPhone 5s, 6s and other versions, then the standard Compass application is already built into it. After starting the program, you need to calibrate it using turns or rotations. When the process is complete, the arrow will indicate the direction of magnetic north.

A detailed guide in this case is equal to a short one. At first, everyone will see four directions - north, south, east and west. The white arrow indicates where you are looking right now. To find the north, you need to stand so that the white arrow and the red one near the north connect.
If you need to go in one direction, set it on your smartphone and fix it on the screen, then the compass will indicate the slightest deviations from the course. By synchronizing with maps it is easy to determine your exact location in. To do this, just click on the bottom of the screen, but before that turn on the Internet and geolocation. A telephone compass, like any digital one (for example, on a smart watch), operates with an error.

Xiaomi, Honor 9 or Samsung phones have a separate built-in GPS navigation function. It works simply: by activating it, you can see in which direction the phone is turned this moment. The information is displayed on the map, and this helps you navigate the area.
You can download additional applications with a compass from the Play Market that will indicate the direction of the world and coordinates, for example, “Compass 360”, “Smart Compass” or “Accurate Compass”.
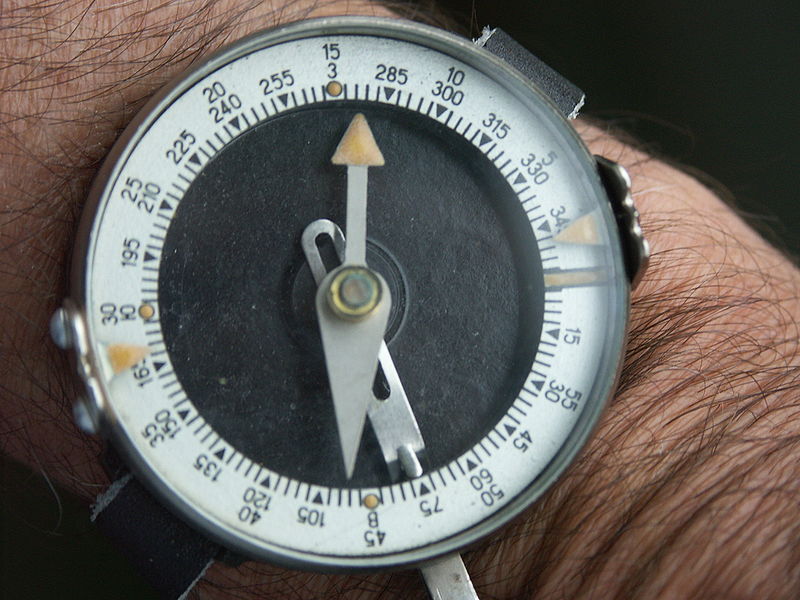
An army or artillery compass is the most reliable. It comes in two types: with a lens and a string or on a board. The first option gives more accurate data, but both types are the same in use. The main thing is to hold the compass correctly. There are two techniques for this - central grip or “to the cheek”.

With a central grip on the compass you need to:
- open the lid, which should create a straight line;
- move the rear sight to clear the dial;
- spread your elbows in different directions, place the device at chest level;
- point at the object and look at the azimuth readings under the motionless black line.
In the second option, you need to open the lid vertically, move the rear sight forward, align the front sight through the sighting slot, and set the azimuth value through the peephole. After this, note the degree readings, then rotate the device until the line coincides with the north. Just in case, double-check the readings.
Compass performance is affected by nearby metal objects and damage.

In general, there are a huge number of compasses - liquid, engineering, tablet, solar, geological, for children and with a clinometer, but they work on the same principle and the data shows approximately the same.
The main division is by type: mechanical and electronic. Mechanical ones have a magnetized arrow pointing to the north, and an electronic device consists of several components, so not only the direction of the world is indicated, but also other information.
Electronic includes several more types - indicating radio devices, with a description additional information(degrees, exact coordinates, nearby objects), with connection to satellites, which allows you to receive the most accurate information. Sometimes compasses develop into large systems, such as, for example, one of the most professional of this kind - “Electrician”. It is used for designing and issuing documents.

By type of application, the following compasses are distinguished:
- tourist (“Tourist 2”, “Gk2”), where there is a magnetized needle, sometimes with liquid filling (“Pathfinder”);
- military - very similar to the tourist one, but it also has a ruler, a sight, a magnifying lens, and can even be used under water;
- geological, where the division goes counterclockwise, there is a clinometer;
- astronomical - helps you navigate by the stars at night time;
- engineering - used when creating projects of buildings and premises (engineer directional compass);
- gyroscopic - directs to the real pole, used in air or water;
- compass - used by surveyors, and sometimes for directing artillery fire.

It is noteworthy that many followers of Feng Shui practice use a compass at home to determine the cardinal directions and correctly arrange furniture. It can be an ordinary tourist compass, American, with a mirror, but a special one is better - a burst.
For orientation in the city, a mobile application will be enough, but when hiking in the forest or at a campsite, a military or tourist compass will be suitable.
There are several types of compasses. To navigate in unfamiliar terrain (determine the cardinal directions), a simple compass, in which the direction indicator is a magnetized arrow, is enough. It is precisely these devices that prudent hunters, fishermen, mushroom pickers, and tourists take with them when going out into nature (going on a hike). At school they teach how to use a magnetic compass, but does everyone remember their geography lessons?
This article will help some to “refresh” their memory, and others will help them understand how to navigate unfamiliar terrain using a compass.
What you need to know about the compass
Its hand (after removing the lock) always takes a position in which one end “looks” to the North (marked on the dial as N or C), the other to the South (letters S or Yu), in accordance with the poles of the Earth. Since compasses are produced by different manufacturers, the designations of its sectors differ. How to understand that the device body is positioned correctly and not turned 180º? Otherwise, the true cardinal directions cannot be determined, and the meaning of orientation is lost.
The letters E or B stand for East, W or W for West.
When determining the position on the ground, it is customary to count from the direction “North”. Therefore, the end of the magnetic needle pointing to it is always marked. This is either a blue mark (sometimes green), or a dot made of phosphorescent composition. The tip can also be made in the shape of a triangle, directed acute angle to the magnetic pole.

But in any case, the side where the “marked” end of the arrow points is necessarily North. Consequently, you only need to turn the body of the device, adjusting the dial scale under it until it aligns with the printed designation N (or C). In older models of compasses, the “south” tip of the arrow is also marked (in red).

How to navigate with a compass
Few tourists, hunters or fishermen take a map with them - they mostly make do. Those who go outdoors with it know the operating procedure well. For most, it is enough to find the way back using a compass. Basically, it is purchased in order not to get lost. What should be done?
When setting off along the chosen route, you should determine the direction of travel. The lock from the arrow is removed, the compass is given a horizontal position and its body is rotated until the letter N of the dial aligns with the “north” tip. All that remains is to wait until the arrow “calms down”.

Having chosen a distant, clearly visible object (a tree, hill or other) along the route, you need to remember in which direction it is. That is, determine the azimuth. The graduation is also marked on the instrument scale. 00 is North, respectively, 90 is East, 180 is South and 270 is West. It is not difficult to calculate exactly what azimuth the movement will take.

If you have to change direction along the route, and this happens quite often, especially on rough terrain, then at each “turning” point you need to again determine a new azimuth, choosing some other object. You shouldn't rely on memory; all data must be recorded. Plus, it is advisable to count steps (with frequent changes of course) or time the movement (with long movements in one direction).

In order to return to the starting place, it is enough to move in reverse side. That is, orient the compass dial to the cardinal points, and mentally draw a line through the center of the device from the primary (measured before moving in the intended direction) azimuth value for a given point. If the movement on the ground was at an angle, for example, 300º, then you need to return in the direction of 120º. It is not difficult to understand if you consider that the difference between azimuths (“forward” and “reverse”) is always 180º.

In specialized stores that sell accessories for fishermen, hunters, tourists or athletes, you can find various modifications of magnetic compasses. In order to find your way in an unfamiliar place, the simplest, cheapest device is enough. It’s hardly worth spending money on a more “sophisticated” device, given that all its capabilities (functionality) will not be implemented in practice anyway.
 Probably, in this regard, the only useful recommendation is to pay attention to “liquid” compass models. A special mixture is pumped inside their flask, which “quenches” the vibrations of the needle. Such modifications of the device are more convenient in that they allow you to navigate without stopping directly while moving. For a tourist traveling on foot, such a compass is preferable.
There are several ways to check the functionality of the device. The simplest of them is to bring the compass closer to any metal product (stained glass frame, door handle, etc.) right in the store. The arrow should not just deviate, but orient itself smoothly, without jerking. This sometimes happens with cheap models due to improper mounting on the axle.
Those who use a compass to “reference” a map to the terrain should remember such a calculation parameter as magnetic declination. The device shows the magnetic pole, but for all maps the geographic pole matters. In most cases, this error in orientation is not taken into account, but if maximum accuracy in determining coordinates is required, it will have to be taken into account. Relevant reference data is indicated on each sheet of the map.
To make sure that the direction to the North is chosen correctly, you need to make several “measurements”, in different places along the way. The magnetic needle reacts to metals, and often the compass “lies” mercilessly, disorienting the user. For example, if there is any object nearby that affects its position (for example, a power line, a huge landfill invisible behind the planting, a “thread” of a buried pipeline, and so on). The same applies to swampy areas.
In this case, the effect of the so-called “swamp ores” appears. The reasons for “failures” in the operation of the needle can be very different, even “anecdotal”. For example, if during orientation you hold both the device and a metal object (knife or something else) in one hand. Experienced tourists are never limited to just determining the direction to the North, but constantly check the compass along the way.

When navigating, you shouldn’t rely only on a compass. Firstly, with a lack of experience, it is quite difficult to accurately determine the azimuth. Secondly, cheap instruments give significant measurement errors. To reduce the time spent finding the starting point, it is useful to remember natural landmarks - roads, plantings, large lonely trees, and the like.
In addition to the compass, it is advisable to purchase a device such as a pedometer. It will help determine the distances from one control point to another. Then you won’t have to track the time or calculate the number of steps. Consequently, the process of orientation on the ground will be significantly simplified.
Although it is possible to survive without a compass in the wilderness, it is very, very difficult without it. However, in order to never get lost or get lost, only a reliable compass and an accurate topographic map It’s not enough, you also need to know how to use them. However, learning to navigate with a compass is not that difficult, as this article will prove to you.
Steps
Part 1
Basics- Main board- This is a transparent plastic plate on which the compass is attached.
- Direction arrow is an arrow on a compass indicating direction.
- Compass ring- a transparent ring in which the compass is fixed, or more precisely, a magnetic needle.
- Division scale- a rotating arc around the compass, divided into 360 degrees.
- Magnetic needle- an arrow rotating inside the compass.
- direction arrow- non-magnetized needle inside the compass.
- Reference lines- lines on the compass panel, laid parallel to the direction arrow.
-
Learn to hold a compass correctly. Place the compass on your palm and bring your palm to your chest - this will be the correct position of the compass when you travel. If you are just checking the map, then place the map on a flat and flat surface, and the compass, accordingly, on the map in order to more accurately navigate the terrain.
Determine which way you are facing. Essentially it is simple and quick way navigate the area and understand which direction you are looking and heading. So, take a look at the magnetic needle. Unless, of course, you're only going north, it should veer in one direction or another.
- Rotate the division scale. This must be done until the direction arrow coincides with the magnetic arrow, that is, until both arrows point north. Then determine which direction you are moving by looking at where the direction arrow is pointing. If it points to the area between the North and East marks, then you are moving northeast.
- Determine where the direction of the movement arrow will intersect with the graduation scale. To determine your direction more accurately, take a closer look at the division scale. If the intersection occurs opposite the number 23, then you are moving 23 degrees northeast.
-
Remember the difference between the geographic and magnetic North Poles. Despite the fact that both of them are “northern”, you will remember the difference between them quite quickly, and this difference, by the way, is very important for correct work with the compass.
- North geographic pole- this is the point where the lines of longitude drawn on maps meet. For all cards this point is the same - at the top of the card. Alas, the Earth’s magnetic field is not uniform, and therefore your compass will point not to the geographical, but to the magnetic North Pole.
- North magnetic pole, accordingly, is associated with the Earth’s magnetosphere, more precisely, with its inclination, which is about 11 degrees from the inclination of the earth’s axis. That is why the difference between the geographic and magnetic north poles is up to 20 degrees in some places. Accordingly, in order to accurately determine the direction and your location, you will also need to take into account the magnetic declination (and it is different everywhere).
- It may seem that the difference is insignificant, but an error of just one degree will lead to the fact that, figuratively speaking, every kilometer of the path will take you 100 meters away from the target. Now imagine what will happen if you need to walk 10 kilometers, 20 or 100. Accordingly, it is simply necessary to take into account the magnetic declination.
-
How to learn to take into account magnetic declination? Good question. Actually, what is “magnetic declination”? This is the difference between the magnetic and geographic north poles. To help you use your compass, you can add or subtract degrees of magnetic declination from your course, but this depends on whether you are using a map or compass and whether you are in an area with an easterly or westerly declination.
- Let's take the USA as an example. The zero declination line runs through Alabama, Illinois and Wisconsin (though slightly diagonally). To the east of this line there will be areas with a westerly declination, that is, in these areas the north magnetic pole will be several degrees west of the north geographic pole. Accordingly, in all areas west of this line, the opposite will be true. Find out in advance the value of the magnetic declination in the area where you will travel - it will come in handy.
- Let's say you are guided by a compass in an area with a western declination. Accordingly, having plotted a course on the map, you need to correct it by subtracting the corresponding number of degrees from it. If you are in an area with an eastern declination, then the course must be adjusted by adding the magnetic declination value to it.
Part 2
Using a compassCalculate your direction. If you're walking through a forest or open area, it doesn't hurt to determine your direction from time to time. To do this, rotate the compass until the direction arrow matches the direction in which you were walking and will be walking. The magnetic needle will coincide with this direction only if you are moving north
- Rotate the arc of divisions until you set the arc so that the magnetic needle points to the north mark. As soon as you do this, you will immediately see what degree the direction arrow shows.
- Minimize the effect of magnetic terrain variations by rotating the graduated arc from left to right by the appropriate number of degrees (depending on magnetic declination). Look at which mark on the graduation scale the direction arrow points to.
-
Continue moving in the given direction. To do this, simply hold the compass correctly, turn with the compass so that the magnetic needle once again points north on the division bar. Start moving in the direction the direction arrow is pointing. Refer to the compass as much as necessary, but be careful not to accidentally move the division bar.
Focus on landmarks that are in the distance. To follow a given direction, look at the direction the arrow is pointing and identify a landmark in that direction (a tree, a telephone pole, etc.). Do not focus on anything too distant (a mountain), as large objects do not allow you to navigate the terrain with high accuracy. Once you reach a landmark, use your compass to locate the next landmark.
- If visibility is limited and you cannot see distant objects, use fellow travelers as a guide (if, of course, you have them). Stand still and ask them to walk in the direction the compass shows. Correct your fellow travelers if they go off course. When they disappear from sight, shout to them to stop and wait for you. If necessary, repeat the procedure..
-
Transfer the course to your tourist map. Place the map on a horizontal surface, place the compass on top, so that the direction line points north on the map. Then position the compass so that its edge passes through your current position (but the direction arrow still points north).
- Draw a line along the edge of the compass and through the point of your current location on the map. If you stick to this direction, your path will follow the line drawn on the map.
-
Learn to plot a course on a map. To do this, place the map on a horizontal surface and place the compass on top. Using the edge of the compass as a ruler, connect the point of your current position to the point you are heading to.
- Rotate the graduation dial until the direction arrow points to geographic north on the map. This will also help calibrate compass reference lines along north-south lines. Once the division scale is set, you can remove the card.
- This will correct the magnetic declination by adding the appropriate number of degrees to areas with westerly declination and subtracting from areas with east declination. This is diametrically opposed to what you did the first time you plotted a course using a compass, so don't get confused.
-
Use new coordinates. Hold the compass in front of you in a horizontal position with the direction arrow pointing away from you. As a result, you use the direction of travel arrow as a guide to your destination. Turn yourself until the magnetic arrow matches the direction arrow. You are now facing the destination shown on the map.
Part 3
Finding your location when you get lostSelect three objects that are marked on your map. They should be as far away from each other as possible, but remain within sight. One of the most important and at the same time difficult tasks for which a compass is intended is orientation on the ground if you get lost. If you find characteristic landmarks or other objects on the map that you see with your own eyes, and those objects are located quite far from each other, then congratulate yourself - you have already “found”.
Understand the marks on the compass. Of course, each compass model has its own look and design, but they are designed according to a similar principle. So, in particular, each compass has a magnetic needle pointing to the magnetic poles of the planet. Next, we will tell you about what a typical standard compass consists of:
The only living organism on the planet that cannot navigate the terrain relying on its senses is man. Being the most intelligent creature, man has learned to adapt to difficulties and cope with them independently.
To move around the area, knowledge and observations accumulated over centuries were used. Determining the cardinal directions was possible based on natural signs (location of stars, vegetation, position of insects, etc.).
Thousands of years after the birth of humanity, even before our era, a Chinese philosopher made an invention that made it possible to accurately determine the position of the cardinal points. This was one of the most important inventions that has survived to this day and is of great importance in the course of world history. How to use a compass? This is what we will talk about today.

Hen Fei Tzu, the name of the Chinese sage, first described the invented device, called the compass. The design was a copper plate, the central part of which was carefully polished, and the zodiac signs were applied along the perimeter.
A deep round spoon with a long cylindrical handle was installed in the center of the plate, which was used for pouring liquid food and drinks. The rounded bottom prevented the handle from falling onto the plate, and the spoon could easily rotate in a circle. The spoon was made of magnetite metal.
The plate was placed on a flat surface and the spoon was pushed into motion. The handle of the spoon always pointed south. This invention holds the reputation of being the first compass used by man.
Several centuries later, again in China, a magnetic floating needle was made, most often in the shape of a fish. The magnet, when lowered into the water, pointed to the south with its head. Around the same period, another Chinese scientist ShenGua developed several compass designs.
He tried to make the device as accurate as possible, using a magnetized needle suspended from a thin silk thread. During the experiments, he noted that the needle points to the south with a small error, which they have since learned to calculate for different parts China.
Chinese sailors of the 11th century had floating compasses installed on their ships, allowing them to navigate quite accurately when moving across the seas. In the 12th century, the experience of Chinese inventors was adopted by Arab sailors, and after another century the compass came to Europe.
The familiar and everyday view that every person remembers was obtained by the compass only in the 17th century. The accuracy of the device was unique at that time and made it possible to easily plot routes for sea voyages.
Design and principle of operation of a classic device
A classic version of the invention is a magnetic compass. Externally, it is a round-shaped body made of durable plastic or brass. A steel pin is fixed in the center of the box, and a magnetic pointer is installed on it in a perpendicular position.
The box has a glass or plastic transparent lid that protects the compass from damage. Damage to the pointer or its mounting may cause the device to malfunction.
Let's look at how to use a compass correctly. The essence of its work is as follows: the magnetic pointer interacts with magnetic fields globe and produces movement along parallels with the force fields of the planet. The arrow shows north in the same way as the lines.
Depending on the design, there are several main types of compasses:
- magnetic;
- electromagnetic;
- electronic;
- gyroscopic.
The essence of the work is the same, but slight differences in the design allow everyone to choose exactly the model that seems most convenient in certain conditions.
Magnetic

The magnetic type of compass is used in most cases. This is a small hand-held device that everyone held in their hands even when they were studying at high school. The main operating element is the magnetic needle, which moves according to the magnetic axes of the Earth.
You can use the device manually, holding the device in your hand and turning in the desired direction, or using a tripod for installation.
Electromagnetic
The design of an electromagnetic compass is much more complicated. It is a small-sized electric generator. The magnetic polarity of the earth acts as a stator. And the rotor is several frames with windings. The voltage in the turns, moving in a magnetic environment, indicates the direction of the course. The use of an electromagnetic compass is common on board aircraft and ships.
The advantage of the compass is the stability of the magnetic needle in relation to magnetized parts of ships, that is, the compass needle is not subject to the magnetic influence of extraneous magnetic forces. This means that the measurement accuracy in this case will be higher.
Electronic
Electronics is taking over all areas of human activity. Terrain orientation is no exception. In appearance, an electronic compass can be confused with a conventional electronic watch, and there is practically no external resemblance to its magnetic counterpart. The electronic compass display shows the measured units. The magnetic needle, accordingly, is absent. The direction of the magnetic field is measured by a special magnetic sensor installed inside the compass.
Using an electronic device can be difficult because the battery may run out at some point. To avoid any difficulties along the way, the best option is to carry an extra charged battery.
Gyroscopic
The most accurate device is a gyroscopic compass, or gyrocompass. It mechanically indicates the position of the Earth's meridians depending on the axis of its rotation. A magnetic compass shows the direction to the pole as a whole, and a gyrocompass indicates the point of rotation of the axis.
Its use is common in marine and missile navigation. Like the electromagnetic one, the gyrocompass is practically insensitive to extraneous magnetic fields.

In the age of development of electronic technology, the use of devices such as a compass is carried out only by professionals who know how to use them correctly.
Today it is difficult to imagine a modern person without a gadget. Software developers decided not to stand still and a Compass application was developed for electronic gadgets on the Android platform, which allows you to navigate the terrain. This development did not bypass the famous Apple brand.
Almost all phones are equipped with a GPS navigation system. However, in some locations, such as forested areas, the location accuracy may vary. Using a compass in such situations will be justified.
How to navigate the terrain using a compass - detailed instructions
To understand how to use a compass, you need to know some subtleties. Let's consider orientation using a map of the area.
To begin, remove the lock from the arrow and, holding the body in a horizontal position, give the arrow the opportunity to stop in the north direction. The compass must be kept away from metal structures, magnetic fields which may interfere with the accurate operation of the instrument.
Using the acquired knowledge, you need to navigate the area and determine your position on the map using a description of the area. After this, a target is selected on the map.
The north of the compass is aligned with the north of the map (this is always its upper border). Next, you need to combine the pointer unit on the compass with the position of the object on the map. We rotate the compass until the magnetic needle shows the north direction on the body of the bulb. You can start moving, while constantly making sure that the arrow pointer always points to the north direction on the bulb.
Not many people know how to use a compass in the forest without a map, so as not to get lost. The principle of orientation on the ground is almost the same as using a map. Only for navigation is it worth choosing a large object.
After the direction of the server and the arrow are visually aligned, draw a straight line through the center of the device to the landmark. The direction of travel will be indicated on the opposite side. On the road, it is better to check the possibility of deviation from the course of movement.
In theory, it is difficult to understand the principle of operation of the device, so the best option would be to consolidate the skills in practice in a familiar area.
When going on a hike or expedition in an unfamiliar area, it is better to have on your team a person who is well versed in the area. If this is not possible, you should always have a compass and map at hand to determine your location.
If you have not previously had experience using a compass, you need to learn and practice determining your location the day before. Use the compass in accordance with the basic requirements (correct position, protection from damage, distance from metal objects).
Following a simple algorithm of actions will allow you to avoid difficulties on the road through unfamiliar terrain.
Conclusion
The invention and use of the compass historically played a huge role in the geographical exploration of the world. Sea voyages brought many results with minimal fleet losses. Orientation by the stars was possible, but the compass made movement across the seas and oceans more accurate and in minimal time intervals.


