Pillow with painting on fabric
Painting on fabric- drawing or patterning on the fabric in any technique, from graphics and painting to prints and embossing.History
Once people learned how to make fabric thousands of years ago, methods of dyeing and painting of matter were immediately found. The earliest techniques are the same as those used by humans to decorate the body. There are two main methods: dyeing (direct application of an image to the fabric) and patterns, or ornaments (a repeating pattern applied from a previously compiled sample).
The Asian continent has the richest history of textile painting. The first samples of painting on fabric that have been found date back to 3000 BC... IN 327 BC, during the invasion of Alexander the Great into India, patterned Indian fabrics became known, which began to be successfully sold throughout Asia, in Egypt, Greece. These fabrics came to Europe and Africa only in 2nd century AD.
Already at the beginning of our era, painting on silk, printing on fabric, screen printing on fabric began to be used in China. The Japanese have also mastered this art.
Very early examples of textile painting found in Peru (dated to 200 BC).
Fabric paints
There are two main types of fabric dyes: dyes and dyes.

Painting with dyes
- Dyes designed for fabrics made from natural fibers (cotton, silk, hemp, wool, feathers, etc.). Dyes, as a rule, are of brighter colors, they have a wide range of colors. Dyes require further fixing on the fabric: this can be chemical treatment or heat treatment (steam, iron).
- Paints more difficult to use, they are more harmful in composition, their use requires a respirator, gloves and a ventilated room. There are paints that require subsequent processing with an iron, and there are those that fix themselves, but this can take about 4-6 days.

T-shirt, painted with paints
Basically, fabric paints are acrylic paints. They do not penetrate deep into the fibers of the fabric, like dyes, but remain on the surface of the material. This sometimes causes the fabric to become less elastic. Therefore, it is better to use paints on heavy fabrics, where this effect is invisible. And dyes are suitable for light, weightless fabrics.
Painting technique on fabric
If you start to paint on the fabric with a brush, it will become noticeable that the color spot does not stay in place, but spreads out. And this is more noticeable on lightweight fabrics such as silk. On a denser fabric (thick cotton), there may not be such spreading of paint, or there may be very little. Sometimes this effect is fine to continue painting. But if you need to fix the stain and control its spreading, then there are several ways:

Painting with a reserve composition
- Reserving compounds, waxes, wax stamps... This technique comes from the art of batik. The reserving compound fences off the exact area on the fabric that needs to be painted over. After the composition hardens, the fabric is dyed, and then the reserve composition is removed from the fabric, leaving the fabric unpainted. Using this technique, you can make multi-layer paintings, achieving overlap of unpainted areas of the fabric.
- Stopping primers... This is a primer that is applied first to silk and then dried. Then - you can start painting. The primer can be made independently from an aqueous solution of starch. Painting with this approach will very much resemble painting on paper. However, not all primers "work" with both paints and dyes, so it is important to buy a suitable primer for the technique that is selected.
- Thick dye... If the colors are thickened, they will not spread on the fabric. This method is suitable if you are making a print, stamp, silkscreen. If it is precisely painting with a smooth transition of colors that is being done, thickening of paints is not suitable. Paints can be thickened with a special synthetic thickener available at craft stores, or with loose pigments (powder paints).
Ways of painting on fabric

The simplest batik
The easiest way is to simply dip the brush into the paint and start painting. But you can try to do everything "according to the mind", having mastered the previously developed technique.
- Batik... The melted wax is applied with a brush or applicator to the fabric to keep the colors from mixing. After that, painting is applied (or the fabric is completely immersed in the dye), while the paints flow into the cracks of the wax, forming fantasy creases and cracks.

Painting made by painting on silk
- Silk painting... In this technique, dyes and dyes are applied to silk stretched on a stretcher. After that, the reserve composition is applied. The painting often resembles a watercolor painting. In order to add texture, salt or alcohol spray is applied on a damp painted surface. Interesting streaks or texture are obtained.

Examples of marbling
- Marbling... From the English. "Marbling", which means "marble". With this technique, paints first cover the water in a bathtub or flat dish (forming a pattern or pattern), and then they are printed on the fabric.
- Print, embossing... In this technique, paint is applied to a staple (cut into any shape) and imprinted on the surface of the fabric.
The first thing to determine is the style in which you want to decorate your apartment.
Walls covered with fabric, doors and windows imitating Japanese fusuma sliding partitions will help to give an ordinary city apartment the atmosphere of the land of the rising sun.
Lightly printed curtains, patchwork bedspreads, pillows, rugs and large lampshades will remind you of warm summer days in a country house.
Skillfully selected wall hangings, furniture upholstery with fabrics of different textures and patterns in the living room and bedroom, various design of windows and doors - all this will allow you to recreate the features of antiquity, Empire, Baroque, Art Nouveau and other styles.
To choose the right fabric for painting, you must be guided by the type of future product. For lampshades, oriental-style chandeliers, curtains, a thin, translucent fabric is suitable, and bed linen, bedspreads, decorative pillows, curtains, upholstery of furniture and walls require a denser material.
Of great importance when choosing a paint for painting is the original color of the material and what kind of weave of threads was used in the manufacture of the fabric: linen, twill, knitted, jacquard or brocade. Before starting work, check on a small test piece to see how the paint absorbs and spreads on the fabric of your choice. So you can choose the optimal painting technique and drawing for your product.
IMPORTANT! The fabric should be washed before use with detergents to remove the finish (a substance used in finishing fabrics in factories). This is necessary for better staining of the fabric. Do not pre-soak the fabric with detergent, as it usually has a bleaching effect.
Securing the fabric to the frame
 Cover the frame with tape before stretching the fabric. Then attach the fabric to the loose frame from opposite sides
  To avoid grooving, pins on opposite edges of the fabric should be offset in relation to each other.
  Then open the frame by pulling on the fabric and bolt
  Then attach the two remaining sides of the fabric.
 Choice of technique
 A dry cloth is tied tightly with a rope or thread. Buttons can be placed inside the knots
  After staining, stylized images of flowers are obtained.
There are many techniques for hand-painting fabrics, each of which has its own specifics. If you decide to try yourself in this art for the first time, we recommend starting with the most ancient and simple way. It has many names: gang-hni, tritic, planks, and the most common is nodular technique... For all the beauty and unusualness of the effects obtained, the technique of performance is very simple. Before dyeing, certain places on a dry fabric are tied tightly with a thin rope, cord, ribbon, or simply tied in a knot. When painting in these areas, the original background color is retained. The pattern depends on the tying system: you can get circles, circles, vertical or horizontal stripes, their combinations. The fabric can be tied in such a way that, after dyeing, the loose knots turn into a drawing of a stylized flower, leaf, etc. Small objects can be placed inside the knots - buttons, pebbles or other shaped parts, resulting in a dyeing pattern in the form of gaps of a certain configuration. The fabric is completely immersed in a solution of salt or soda ash, boiled in it for 10-15 minutes, then paint is added there. Further operations are carried out according to the instructions on the paint packaging. Modern dyes make it possible to dye fabrics in washing machines at a temperature of 60 C. Then the fabric is washed without undoing knots and the paint is fixed. The dried fabric can be re-dyed in a different color.
IMPORTANT! Coloring is carried out from lighter tones to darker ones. Do not make more than three color overlays. Without the knowledge of color, you risk getting “something” of an indefinitely dirty color instead of the original product and forever losing the desire to engage in this type of creativity.
To perform the following painting techniques, special preparation of the fabric is required, which must be pulled over the frame and the pattern is transferred to it. In this case, it is convenient to use pins so as not to damage the material.
Any drawing you like can serve as a motive for painting. It should first be transferred to tracing paper, and then in black ink or ink - onto thick white paper. The finished template is placed under the fabric stretched over the frame, fixed with adhesive tape, then the contours of the pattern are transferred to the surface to be painted. If the fabric is dense and opaque, a lamp is brought under the frame and the template is illuminated from below. On sale there are ready-made motifs for drawings, which are transferred to the fabric by ironing.
IMPORTANT! In any case, the drawing should be transferred to the fabric already stretched over the frame and after that it cannot be removed from the frame.
Contour painting
 It is better to attach the drawing with tape, this will help to avoid displacement when transferring it to fabric
  When transferring a drawing to fabric using a phantom felt-tip pen, you can not be afraid of mistakes, the lines disappear when exposed to water
  Apply a reserving compound with an outline painter.
  Filling the space inside the contour with paint should start with the lightest shades, and then move on to darker ones.
Contour painting is based on the use of reserve compositions that limit the spread of paint on the canvas. The artistic feature of this method of painting is that the obligatory color outline gives the drawings a clear graphic character. Moreover, the number of colors is not limited. The reserve composition is applied to the tissue in the form of a closed loop. Good penetration of the reserve into the fabric is the most important condition in contour painting. If gaps and gaps remain when drawing the outline, the paint will come out of the drawing. The thickness of the targeting contour and the consistency of the reserve composition depend on the density of the fabric, its texture, as well as on the absorbency of the fabric. Dense materials, due to their structure, require a wider contour and a liquid reserve composition for better impregnation. Often, a reserve is induced on both sides of tissues of this type. When working on dense fabrics, a thick outline is suggested, and on transparent, light fabrics, a thinner one. After the outline of the drawing is drawn, it is allowed to dry.
IMPORTANT! Before applying paint, it is necessary to check the quality of placing the reserve on the seamy side of the sample by dripping inside each form of water. If in any place the water breaks through the reserve, this section of the sample should be dried and the reserve should be reintroduced, but already on the wrong side. Then check the line quality again.
At the beginning of the line and in areas where the hand moves more slowly, drops are usually obtained. To avoid this, you should lead the tube or the tip of the tube over the fabric as evenly as possible, and at the beginning of work, either quickly lower the end of the tube to the surface, or start applying the reservation composition directly from a sheet of paper previously applied to the working surface of the fabric.
Fill with color should begin with the lightest tones, so that it is easier to cover unwanted defects with a darker tone. At the same time, one should not forget that areas of the drawing must be evenly saturated with paint so that streaks and halos do not form.
Headband
 Before applying an impression on the fabric, make it on paper, thus removing excess ink from the stamp. Healing is done using stamps. Work must be carried out on a table with a flat surface. You can use a drawing board covered with a flannel blanket.
Place the frame with the stretched fabric on the table. Dip the stamp into the prepared ink, make a proof print on the paper, removing excess ink, and only then make an impression on the fabric. Repeat the operation several times. After finishing work, the dies must be washed and dried.
Free painting
 When working in the free-painting technique, the fabric is impregnated with water for better paint flow
  Apply the paint with free strokes with a thick brush. The method of free painting, which is performed without using a reserve composition, differs significantly from the contour and nodular, both in the method of work and in the appearance of the finished product. This technique is close to watercolor painting. Here soft, picturesque transitions of tone are possible without sharp outlines of the form. painting reveals the originality of the author's handwriting and gives the products the individuality inherent in manual labor.
Pull the fabric over the frame. Choose a range of colors in accordance with the intended image. Process the fabric with paints in an arbitrary painting manner, using not a specific pictorial motive, but some associative image: autumn, winter, spring landscape, early morning, twilight, fog, etc. In accordance with the idea, it is necessary to choose a range of colors. The pattern is applied to the fabric with free strokes and only the final finishing is sometimes done with the help of a cold reserving compound.
Free watercolor painting
 After applying a watercolor primer or salt solution to the fabric, you can paint on it like on paper

Free watercolor painting is based on the use of saline or special watercolor primers. The fabric stretched over the frame is impregnated with an aqueous solution of sodium chloride or watercolor primer, and after drying, it is painted with paints. Since the saline solution limits the spread of the ink on the fabric, you can work with loose strokes. The painting is carried out according to the principle of watercolor painting: from light to dark, from the top to the bottom.
Free painting using salt crystals
Another way to freely paint fabrics is based on the use of crystals of salt or urea. The fabric is stretched over the frame and treated with liquid dyes. Then, salt crystals are poured onto the still wet fabric, in accordance with the design of the drawing, which actively attract the dye, thereby darkening those areas of the fabric on which they are applied. The resulting effect largely depends on the size of the crystals. After drying on the fabric, the salt is removed. The effect achieved with dry urea is similar to that of saline. However, if salt, attracting the dye to itself, concentrates it on the fabric, then urea, on the contrary, whitens the dyed fabric. This method is very simple and accessible, and most importantly, it gives a wide scope for experimentation. A softer effect can be obtained by using not dry urea, but its concentrated solution (1 teaspoon of urea per 50 ml of water), in which a brush is dipped and a pattern is applied to the fabric in the manner of dot or line art.
 Salt or urea crystals are applied to the wet surface of the fabric
  Until the work is dry, you can correct the drawing by darkening or whitening certain areas with special means
  You can use a hair dryer to speed up the drying process.
  Salt or urea after drying the fabric is brushed off with a brush or a wide brush
Method of blowing dye onto fabric through a straw
Using this method, you can get a wide variety of variegated textures. Spraying dye in several colors gives interesting effects. Apply the paint with a drop exclusively on a dry cloth, then carefully blow it into certain areas of the fabric through a tube. As a result, an interesting effect is obtained that can be used as a pictorial basis for creating a motive for a bouquet or a single plant.
Free painting by airbrushing
 When working in the offset technique, it is not necessary to pull the fabric over the frame, folds and kinks result in additional original effects
  Place the stencils on the fabric. Dry the fabric after each step of applying the paint.
  The composition can be decorated using stencils "masks". For this, dry plants, lace, buttons, beads are suitable.
  It is possible to remove stencils-"masks" only after the fabric is completely dry. Airbrushing is, as it were, in the middle between manual and machine painting methods. In cases where it is necessary to obtain evenly painted surfaces, it is irreplaceable. In the work, in addition to airbrushes and spray guns, refueled with liquid paint, all kinds of dyes in aerosol cans can be used. There are many techniques for practicing airbrushing. The displacement technique is based on spraying dye by manipulating a spray gun. The airbrush jet in this case works in the hands like a brush, providing the opportunity to obtain halftones and color transitions. The spraying technique produces images with a soft, as if melting, fuzzy contour. In airbrushing it is possible to achieve an almost limitless variety of colors and shades.
Pull the fabric over the frame. Prepare a range of dyes from 3-4 colors and fill the dye into the airbrush. Spray paint on a small area of the fabric. Repeat the same operation with other dyes, keeping small areas of the already applied color. Airbrushing can also be performed on already dyed fabrics.
Pull the boiled cloth over the frame, paint it in any medium tone color. Dry the sample. Then do all the above steps in sequence, reducing the number of sprayed colors to two. Other techniques for working with an airbrush are based on the use of stencils and cover patterns - "masks". Pull the fabric over the frame. Prepare stencils of simple geometric shapes.
IMPORTANT! When using paper stencils or stencils made of soft polymer material, they must be attached to the fabric around the perimeter with adhesive tape to avoid displacement during operation. This is especially important when using tampons, brushes and sponges.
Prepare a range of dyes. Depending on the desired effect, place the stencils on the fabric in a specific sequence, and paint over the empty areas with the appropriate color. Dry the tissue after each operation. Working in this way, it is not always possible to predict the result, so you can correct the composition at the last stage, using stencils - "masks". Live or dry plants, all kinds of nets, lace are used as "masks"; brooches, buttons, sheets of plain paper, cardboard, etc. are also suitable.
Working with templates gives you a lot of scope for creating complex designs. In airbrushing, a lot depends on your experience and taste. Even in the case when the composition has already been set by the artist, its execution requires careful attention and artistic flair. The result largely depends on the art of manipulating the airbrush, on the ability to direct a stream of sprayed paint, the duration of the spraying process, techniques for the transition from one tone to another, etc. The weak point of airbrushing is a very indefinite, vague contour. To make it clearer, airbrushing is sometimes combined with a contouring technique. That is, first the contours of the drawing are drawn, and then the paint is applied with an airbrush. The disadvantage of the airbrushing method is also the appearance of a "fog" of sprayed paint, which requires special prudence and caution from the worker. Airbrush work, as a rule, is carried out in special protective masks (respirators) and in well-ventilated areas.
Fabric painting "marbled" (marbling)
 When working in the "marbling" technique, a drawing is created on the surface of the paint with a stick or a needle
  The fabric should be placed in a bath with the resulting pattern over the entire surface. This technique is very effective and opens up ample opportunities for improvisation. It can be used as an independent painting technique or used in combination with other techniques. A particularly interesting effect can be obtained when using satin silk. For painting "marbled" requires a special component THICKENER in the form of a powder, which is used to create the basis of the picture. The composition is diluted in a ratio of 1 teaspoon to 1 liter of water. A flat bath with a height of 2-4 cm is best suited for this. Work with the resulting gel-like mass can only be started after an hour. Paint is applied to the composition with drops, bottles with a pipette ensure ease of use. Then a pattern is created on the surface with a stick or needle. The fabric or paper should be laid flat on the resulting pattern. Leave in this form for 20 seconds, then remove and quickly rinse with running water. Allow to dry, fix. The most interesting thing is that the drawing can be constantly updated and applied in layers. The prepared composition can be used many times. Any reserve composition can be used as a decorative finish; unpainted stains remain in the areas where it is applied to fabrics. The MARBLING technique is very interesting and colorful, it allows you to imitate marble stains and get original color solutions.
Monotype and putty technique
 Gently lift the printed fabric, making sure that it does not shift. Monotype is no less interesting. This technique is quite simple to perform and is accessible even for children. You will need a sheet of plastic or glass. Paint is applied to its surface with free strokes, it should be thick, like a paste in a tube. Then the fabric stretched over the frame is firmly pressed against the glass. This operation can be repeated several times until the paint on the glass is completely used up.
At putty technique thick paint is applied directly to the fabric, creating an embossed surface.
Photo effect
 The result obtained by the photoelectric effect method is similar to airbrushing, but the work process is devoid of unpleasant moments associated with the difficulties of working with an airbrush.In addition to the classical methods of hand-painting fabrics, paints and related materials that appear on the market have significantly enriched the practice of artistic painting in obtaining especially original decorative effects. One of them is the photo effect, which is based on certain qualities of the paint. You can put a variety of templates on the still wet paint. Then place the work under a bright lighting fixture. As it dries, the paint under the templates brightens, giving the image some mystery and haze.
Using new paints and materials, you can achieve complete similarity of the finished work with applique, beadwork and rhinestones.
Painting on fabric is an interesting and exciting art. We hope that this material will help you in mastering this difficult type of creativity.
The editors would like to thank Alla Nikolaevna Novikova and Lyubov Bolycheva, textile artists Irina Bychkova and Elena Vasilieva for their help in preparing the material.
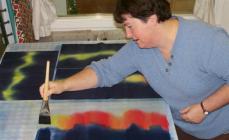
Friends! Today we decided to tell you a little about batik.
This painting became popular primarily among the peoples of Indonesia and India, and only in the twentieth century it became known in Europe.
Batik- hand painting on fabric using reserve compounds. For her, fabrics such as silk, cotton, wool and sometimes even synthetics are used. Each fabric requires the use of a special paint, and to obtain clear boundaries at the junction of paints, a special fixer is used, called a reserve, which is based on paraffin, gasoline, or water - it all depends on the chosen technique, fabric and paints.
master - Sokolova Nadezhda
There are several types of batik:
Hot batik.
As a reserve, wax is used, which is applied with a special tool, chanting. Wax is used in a hot, melted form, therefore batik is called hot)) It is mainly used for dyeing cotton fabric. After finishing the work, the wax is removed from the surface of the fabric.
Cold batik.
In most cases, this method is used to apply a crinkle to silk, but other fabrics are also possible. The role of the reserve here will be played by a special material that can be prepared at home or bought ready-made. It consists of rubber glue, gasoline, dye and paraffin wax. Reserves are colored and colorless and are applied either with special tools - tubes with a reservoir, or using tubes with a special long nose. This type of painting is more graphic, it can be recognized by the lines from the reserve - they serve as a border that holds the paint.
master - Maria Kaminskaya:
Free painting.
Provides great freedom in the choice of drawing, allows you to reveal the originality of the handwriting of each artist and the individual uniqueness of works inherent in manual labor. It is produced mainly with aniline dyes, as well as oil paints with solvents. Particularly interesting is the combination of free painting with contour guidance and finishing with a reserve composition. But basically, with this painting, they do not use the reserve. Such painting is carried out on dry fabric (then the pattern is clearer, halos from spreading paint are visible) and on wet fabric (the pattern is smoother, with smoother color transitions)
master - Sokolova Nadezhda
Free painting on salt ground.
The essence of this method is as follows: the fabric stretched over the frame, depending on the nature of the pattern, is either impregnated with an aqueous solution of sodium chloride and painted after drying, or the painting is carried out with paints from basic dyes, into which a solution of sodium chloride is introduced. All this limits the spread of paint on the fabric, makes it possible to carry out drawings with free strokes, varying the shape and degree of color saturation. Free painting with paints with the introduction of a saline solution into them can be combined with ordinary painting with cold batik. To do this, some parts of the pattern are free-painted with revision with a graphic pattern, and background overlaps are made in areas limited by the reserve composition. Instead of salt, starch or gelatin can act as a soil.
With the help of salt and urea, special effects can be achieved (with free painting and cold batik). For example, if you sprinkle coarse salt on a damp, painted area, the salt will "attract" the dye to itself, creating an interesting pattern. The effect of urea is the opposite, it repels the dye.
Shibori technique.
This technique has Japanese roots. Here, the fabric is folded in a certain way, by bandaging, and then dyed. Often, beads, buttons, etc. are wrapped in the fabric and tied with a thread; the fabric can also be folded and stitched with a thread by tightening it tightly.
Bandana technique.
This is a knotted batik technique. One of its varieties, the plangi technique, was widespread in India. The unpainted canvas was covered according to the pattern with very small knots, tied tightly with thread. Then the fabric was dyed and the threads were removed, resulting in a pattern of white "Peas". If necessary, it was possible to dye the fabric in this way several times, removing old nodules and adding new ones. The dressing threads were removed from the dried fabric, but the finished product was not ironed, due to which the “crunchy” effect remained for a long time.
Nowadays, nodular painting means simpler options. For example, a pattern in the form of a circle (sun) or several circles. When dyeing a dry fabric, you can get a sharper border of the dye of an unpainted canvas, but if the fabric is wet (moistened and well wrung out), smoother transition boundaries.
Interested in interesting hobbies? Don't miss the opportunity to try one of the oldest painting techniques - batik. With a little effort, you will find a real masterpiece in your hands.
Batik is the art of drawing a pattern on fabric, known since ancient times. Over the centuries, batik objects have been highly prized, and the skill of some artists has reached incredible levels. It is interesting that in many parts of the world - India, Africa, Indonesia, Japan, batik art has traditionally been exclusively women. Perhaps this is due to the fact that this craft requires painstaking work, attention to detail, as well as a delicate feminine flair in choosing a color.
History of magical craft
The first fabrics with patterns appeared in the 4th century BC. e .. These were the materials that the Egyptians used for the ritual burial of mummies. In the 7th century A.D. NS. batik began to spread in China and Japan. This art has become widely known in Persia, Sri Lanka, Malaysia, Peru.
Perhaps the most famous country for its unique batik is Indonesia, where the art of artistic painting on fabric took root back in the 12th century. There are about three thousand variations of traditional images for batik! The patterns are applied with wax - Indonesian technology refers to hot batik. Local residents have a special attitude to this kind of art - people here still believe in its magical and healing properties.

So, for example, in a wedding ceremony, it is customary to bind young people with a batik scarf in order to unite their souls together. And babies in these parts are usually worn wrapped in a painted scarf thrown over the shoulder. Indonesians also believe that batik has a powerful energy and can even heal from ailment.
Great importance is also attached to color - it is believed that each color of batik can influence human nature in a certain way. For example, lilac pink helps to preserve beauty and prolong youth.
At the beginning of the 20th century, the art of batik became especially popular among some tribes in Africa, in particular those living in Nigeria and Senegal. The traditional Yoruba batik is called the adire - it is still widely popular among Nigerians.

Following a centuries-old tradition, patterns are applied with a starch mass using feathers, then the fabric is dyed with a natural dye in indigo color. Both casual and festive clothes are sewn from such fabric. At the same time, the drawings are a kind of code that carries the history of the tribe.
Also, among African peoples, another method of ornamental material is popular: before immersion in paint, it is stitched or knotted in a certain way - this is how craftsmen get bizarre patterns on the fabric. This method is also called "knotted" batik.
He enjoyed immense popularity in the 60s and 70s of the 20th century among the representatives of the hippie movement. Thanks to this dyeing of the fabric, bright psychedelic stains with a radiant effect appeared on the clothes of young people.
Types and classification of batik
Depending on the technique of execution, the following types of batik are distinguished:
- cold - for this technique, the contour of the pattern is applied with a reserve agent based on gasoline, rubber glue and paraffin;
- hot - the drawing is applied with a liquid wax composition (hot) not only on the contour, but also on each color; after the end of the work, the wax is removed with gasoline;
- nodular - the pattern is obtained by tying the fabric in a certain way (without using a reserve) and either dipping it into a dye or applying it with a brush.

Cold batik technique


Hot appliances
Sometimes free painting is distinguished as a separate type, in which the contour liquid (reserve) is not used, and the drawing is simply applied with paint.
The hot batik technology is more complicated and time consuming, so it is better for beginners to opt for the cold version. As for the knotted batik, experimenting with this technique at home can be very interesting, and you can get impressive results the first time.
Features of the cold batik technique
Batik as a hobby is suitable for collected and patient people, since this process is quite laborious and time-consuming. However, having received the first results of your creativity, you will not regret for a minute that you have chosen to paint on fabric. The batik technique for beginners is not much different from the technique for professionals. There are a number of requirements that must be met before taking on a job.
For cold batik, it is good to have a separate workplace - a balcony or other well-ventilated room is ideal, since inhaling vapors of a reserve substance is not very good for health (it contains gasoline).

If you plan to use a painted fabric for practical use (in the form of a scarf, tablecloth, etc.), then keep in mind that in this case an additional step for fixing the paint will be required - otherwise, at the very first wash, all the colors will be washed off.
There are several ways to fix it at home:
- baking the product in the oven at a temperature of ~ 150 degrees for 15-20 minutes (you need to put the product in a cold oven, after wrapping it in a white cotton cloth, after turning off the oven, you should not take out the batik for an hour);
- steaming in a water bath without contact of the product with water or condensation (in this case, the batik is wrapped in cloth and paper several times, and then placed in a pot of boiling water so that there is about 5 centimeters to the water: either it is tied to the handles of the pan by the strings, or attached to the net from above);
- fixing with an iron is as follows: every 10 cm square. ironed for 3 - 5 minutes (ironing mode should correspond to the fabric);
The success of fixing flowers also depends on the quality of the paints themselves, however, in any case, it is worth washing batik only in cool water with a small addition of vinegar.
What you need to prepare for the first lessons
Hoop or frame
If you are going to print on a small area of fabric, the hoop is suitable for you. If you want to work with a large format, you will need a special batik frame or a regular stretcher on which you will need to fasten the fabric.
On the frame, the fabric is attached to special hooks that usually come with it. You can attach the fabric to the stretcher with a thread and a needle so that the fabric itself does not come into contact with the frame. A simpler option is also possible: fix the fabric with buttons or a furniture stapler (of course, you should not do this with silk).

Textile
For batik, it is best to use thin natural fabrics: silk, cambric, two-thread. Dense fabric is not suitable, as the reserve may not pass through thick fibers and in this place then there will be an "explosion" of paint - one color will flow into the territory of another. For better, opt for cambric.
Paper
For a preliminary sketch, you will need a sheet of thin paper the same size as the drawing area on the batik.
Materials and tools
Paints, a reserve agent, a glass tube for a reserve - usually all of these are in a batik kit. Sometimes you can find a contouring liquid already ready for application - in the form of a tube with a thin tip. In this case, the glass tube is not needed.
You can go a more complicated way - to cook a reserve at home, and instead of a tube, adapt bottles with suitable nozzles. However, cooking a mixture of gasoline and rubber glue is not only unpleasant, but also fire hazardous.
Therefore, purchasing a ready-made set of materials from everything you need for batik is the best option. Paints in it most often come in the form of a liquid, less often in the form of a powder, which must be diluted with water.

To work with batik, it is best to wear a work gown or clothing that you do not mind getting dirty, as there may be problems with removing paint stains. Batik brushes should not be hard - soft synthetic or squirrel brushes are ideal.
From preparation to masterpieces
Stages of work on batik:
- At the first stage, you need to stretch the fabric so that it does not sag; often batik masters prefer to stretch the fabric when wet - after drying it becomes more elastic;
- at the second stage, a sketch is being prepared - it is drawn on paper with a pencil, pressing well on the rod.
- At the third stage, the sketch is transferred to the fabric - the paper is fixed under the fabric so that the lines of the drawing can be traced on the fabric with a pencil (a soft pencil is suitable for this purpose).
- At the fourth stage, you should outline the contours with a reserve - it will remain white (if you wish, you can color the reserve with the help of a suitable pigment); the reserve is recruited in this way: the spout of the glass tube is lowered into the container with the contour liquid, and a rubber syringe is inserted into the other end, with the help of which the liquid is sucked into the tube.
- At the fifth stage, you need to check the contour - after the reserve on batik is completely dry, you need to use a brush soaked in water to walk over the entire drawing on one side of the contour, and after a few minutes check if the water has gone beyond the reserve line; if you find places where the contour turned out to be weak, after the fabric is completely dry, you need to walk again with a reserve in these places;
- At the sixth stage, the batik is dyed.
- At the seventh stage, the batik is removed from the frame and fixed by baking, steaming or ironing.

After the end of the session, the reserve must be blown back into the container and the tube should be rinsed in gasoline, otherwise the remnants of the reserve substance will harden and the instrument will be unsuitable for further use. It is good to arrange the finished work in a frame with a wide mat.

An interesting effect is obtained from applying coarse salt to a damp dyed fabric - it leaves whitish streaks, absorbing some of the paint. Sometimes, batik masters manage to create interesting compositions using this technique exclusively, even without using a reserve.
From hobby to pros
While painting fabric, you will certainly feel your involvement in high art. Batik is especially popular today as a hobby. This is primarily due to the fact that this type of creativity opens up enormous opportunities for self-realization for a novice artist. Dedicating time to batik, you will constantly be in search of new ideas, themes or techniques. And having felt the charm of the spreading of paints on matter, drawing on paper will seem boring to you.


With a serious approach to work, you can soon become a real pro in this business. Most people for whom batik is their main profitable occupation once started with it as a hobby. In addition, silk painting is still highly valued and, using ours, you can make money on this hobby.
Reading time: 5 minutes
How to add personality to a typical home interior? What will become the hallmark of your own image? Only a part made in a single copy. There are several ways to paint on fabric that can turn a simple scarf into a designer item.
It is worth starting work by studying the features of coating fabrics with dye in various ways. There are several time-tested techniques for applying a picture to a canvas:
- ... A layer of molten wax is applied along the contour of the drawing, which will prevent the colors from mixing. Cover the fabric with a brush with multi-colored paint. If it is necessary to obtain a monochromatic dyeing with a fantasy ornament, the entire product is completely dipped in the dye;

- marble painting or marbling. Typical stains are obtained due to the spreading of the dye over the surface of the water into which the matter is lowered;
- art painting. This technique is used to create unique designs on silk. To separate paints of different colors, a special reserve composition is used after applying each tone.

There is a way to get a pattern on the fabric not by dyeing, but by removing excess paint. Special compositions can be used to make part of the picture transparent. Or vice versa, the photosensitive solution is applied through a stencil and when sunlight hits such areas, they become brighter.
Features of working with dyes
 The problem of painting on fabric is the uncontrollable spreading of paint on matter. To stop this process, reserve compounds, wax, stopping primers are used.
Wax for separating colors in a drawing on a fabric has been used for hundreds of years in the batik technique. It can be applied along the contour of the drawing or a special stamp is made from it. The chemical industry produces modern reserving compounds that act like wax. Under such compounds, the fabric remains unpainted.
It should be remembered that the more liquid the dye, the more it will spread. Many paints can be artificially thickened with a synthetic additive. The use of paints of different thicknesses allows you to get soft transitions, shades, watercolor painting.
The choice of fabric for painting
 Matter is selected depending on the purpose of the product and the chosen dyeing technique. There are several rules, the implementation of which will allow you to get a truly unique thing:
- a fabric with a homogeneous composition is selected. In this case, the coloring will be at any point of the product of the same intensity;
- hot wax will not damage plant fibers, viscose. The most suitable for working in the "hot batik" technique are cotton, linen, woolen fabrics;
- the backing compound must penetrate the fabric through and through. This property is possessed by,, thin wool;
- acrylic paints can be used to paint not only fabrics, but also leather;
- if a clear distinction of colors is not assumed, a material that absorbs moisture well is selected. In this case, the paint spreads quickly, and when mixing colors, soft, original transitions are obtained.
In order not to be mistaken in the choice of fabric, they take a small flap and make a test drawing.
In order to get an original thing, it is not necessary to master the complex nuances of painting on fabric. You can simply tie a few knots on a piece of cloth and boil it in dye.
The order of tying knots allows you to get any pattern from circular streaks. If you tie an object with a square, triangular or other geometric shape, a more complex ornament is formed.

It is easy to get an unusual pattern using the shibori technique. It is also called “origami for fabric”. Before painting, the matter is folded in a certain way so that each bend defines the outline of the drawing.
It is very convenient to use a stencil for applying the contour of the future ornament with gold, silver, black / white paint. After it dries, the gaps are filled with the necessary colors. In this case, the colors are not mixed due to the contour.
Real painters
Anyone who knows how to draw should try their hand at free painting. This technique does not imply clear outlines of one color. To slow down the spreading of the coloring matter, a priming of the material is used.

If no primer is used, paint can be applied to a damp cloth in wide stripes from light to dark. Then, in large strokes, complete the basis of the drawing. Small strokes are used to detail the future picture. Special effects are obtained in several ways:
- if you blow on a drop of paint through a thin tube (for example, a cocktail tube), it spreads. With certain skills, specific images are obtained;
- the addition of alcohol to the dye allows to speed up its drying. This changes the speed of spreading, mixing colors;
- salt has good moisture absorption. When a mudflow pattern is applied to an already painted thing, an unusual texture of the image is obtained.
What else…
 It is most convenient to use. They are easy to use and affordable.
After finishing work, perform a number of mandatory actions with the finished product:
- drying of matter up to 3 days;
- rinsing in cold and hot water;
- hand wash with soap;
- silk is placed in a vinegar solution for 10 minutes. To prepare a solution, 2 tablespoons of vinegar are diluted in a liter of water;
- cotton, linen, it is necessary to boil for no more than 5 minutes with washing powder;
- ironing wet from the wrong side and then from the front side.
The drawing is chosen depending on your own taste. You can come up with it yourself, purchase it in a specialty store or find it on the World Wide Web.