In this article we will show how to make so that USB Flip or SD. The map was defined in the Windows system as an ordinary local hard drive. You probably ask, why do you need it? The fact is that Windows defaults USB USB flash drives and memory cards as interchangeable drives that cannot be divided into several sections with standards. And even if you split the flash drive to two or more of the partition using third-party utilities (in the same Linux), only the first one of them will be available in Windows (by the way, in Windows 10 1703, a built-in) appeared. Those. Windows supports normal operations with multi-sections for HDD disks, which are defined in the system as local (i.e. non-removable).
RMB bit and USB media
Windows Family OS recognize USB flash drives as removable / recoverable (removable) devices due to the presence of a special bit descriptor on each device Rmb. Removable Media Bit.) . If during a survey of the connected device via the StorageDeviceProperty function, the system determines that RMB \u003d 1, it displays that the connected device is a replaceable drive. So that from the point of view of the system to convert a USB flex to a hard disk, it is enough to modify this descriptor. This can be done directly (which is quite risky due to the differences in hardware implementations of specific devices, and it is not always possible), or indirectly, changing the USB response of the device using a special driver that allows you to filter information in the device response.
Council. Some manufacturers produce special utilities for flashing the controller of their flash drives. First, try on the manufacturer's website to find such a utility and / or firmware. This is the most correct way. If there is no such utility, follow the recommendations from this article.
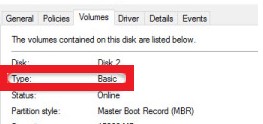
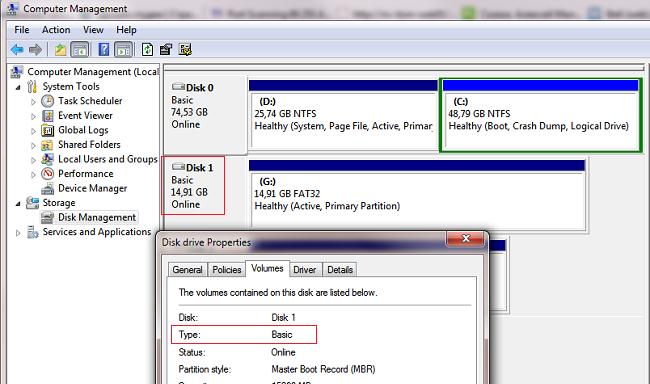
We connect to any free port of the USB flash drive, then open the disk management manager ( diskmgmt.msc.) and make sure that its type is determined in the system as Removable(Removable device) .
Also, the type of device can be viewed on the Volumes tab in the disk properties (as we see and here Type: Removable). 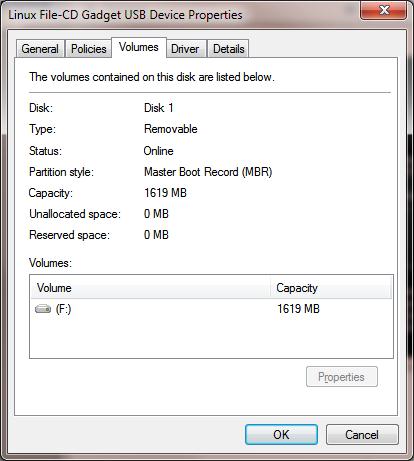
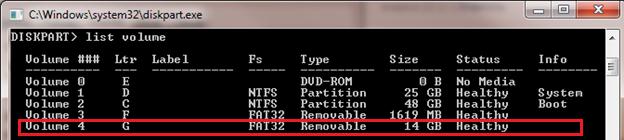
Or using the DiskPart command:
List Volume
In this article, we will look at two ways to change RMB bits on a USB flash drive - by using the Hitachi filter driver (changes are made only at the level of a specific computer driver) and shifted a bit in the controller firmware using the Lexar Bootit utility (more versatile method, but there is A number of restrictions and apply not to all models of flash drives and SD cards). Although both of these methods are quite old and initially I tested them in Windows 7, they continue to be relevant and equally well and in modern Windows 10.
Lexar Bootit utility
I recently came across a rather interesting utility - Lexar Bootit.. This is a free portable program that can change the RMB of a removable drive by making a removable USB device fixed (or vice versa). Despite the fact that the Lexar Bootit utility is designed for Lexar devices (Micron, Crucial), it can also work with flash drives of other manufacturers. The Bootit utility supports all versions of Windows starting with Windows XP and ending Windows 10.
Important. The utility is guaranteed for Lexar drives. Judging by the reviews, the Flip Removable Bit feature does not work on fast USB 3.0 flash drives. In addition, when flashing a controller, you lose the warranty on the USB flash drive and can make it an inoperable.
You can download Bootit on Lexar (Lexar_usb_Tool) or from our website ().
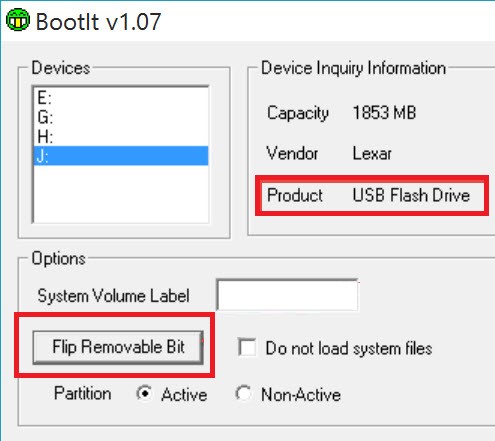
- Run Bootit.exe with administrator rights
- In the list of devices, select your flash drive
- Click on the button Flip Removable Bit.
- Save the changes by clicking OK.
Reflip the device and using the Device Manager, make sure that its type has changed from Removable on Basic.
In the event that the bootit utility did not help change the RMB bit on the removable drive, try using the following method based on the Hitachi MicroDrive driver driver
Filter Driver for Hitachi Microdrive Flashpeckers
To the USB flash drive or SD card recognizes in the system as a hard disk, we will need a special filter driver that allows you to modify the data transmitted through the system stack of the current device driver. We will use the filter driver for USB flash drives from Hitachi ( hitachi MicroDrive driver), which at the OS driver level allows you to change the type of flash drive device with a removable fixed (USB-ZIP -\u003e USB-HDD). Through the use of this driver, you can hide from the system that the connected device is removable. As a result, the system will assume that it works with a conventional hard disk that can be divided into sections that will be available at the same time in the system.
Archives with Hitachi Microdrive Driver:
- 32 bit Systems - (3.0 kb)
- hitachi MicroDrive version for 64 bit Systems - (3.8 KB)
You need to download the driver version for your system in accordance with its discharge. Both archives have the same structure and consist of two files:
- cfadisk.inf.- installation file, with driver settings
- cfadisk.sys - Hitachi driver file
The next step is to identify the device code of our flash drive. To do this, in the disk properties on the tab Detailsin parameter Device Instance Path. Select and copy ( Ctrl + C.) Device instance code. 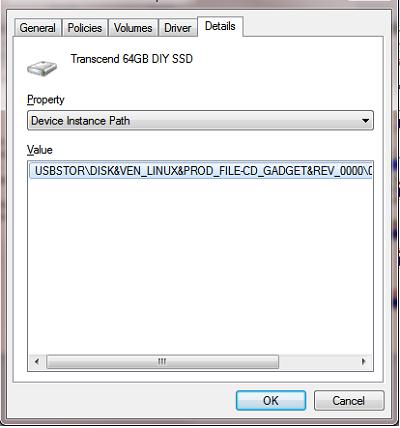
In our example it will be:
USBSTOR \\ Disk & Ven_Linux & PROD_FILE-CD_GADGET & REV_0000 \\ 0123456789ABCDEF & 0
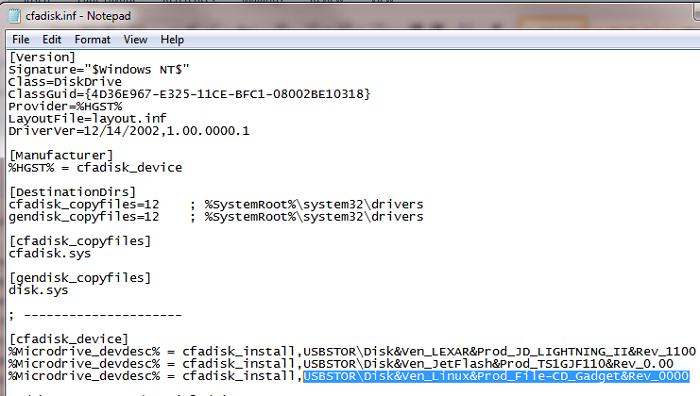
Suppose we plan to install the driver on 64 Bit System. Using any test editor, open file editing cfadisk.inf.. We are interested in CFadisk_Device and CFadisk_Device.ntaMD64 sections.
% Microdrive_devdesc% \u003d cfadisk_install, IDE \\ Diskts64GCF400 ______________________________ 20101008% microdrive_devdesc% \u003d cfadisk_install, IDE \\ DiskTS64GCF400 ______________________________ 20101008
Change the value diskts64gcf400______________________________________________________20101008 on the code of our device.
Important! In the device instance code, you must discard the part after the second "\\" (in our example, we fold 0123456789Abcdef & 0).
We get:
% MicroDrive_DevDesc% \u003d CFadisk_Install, IDE \\ usbstor \\ Disk & Ven_Linux & Prod_File-CD_GADGET & PROD_FILE-CD_GADGET & REV_0000% MICRODRIVE_DEVDESC% \u003d CFADisk_Install, IDE \\ USBSTOR \\ Disk & Ven_Linux & Prod_File-CD_GADGET & REV_0000
Save the file.
If the driver is installed on a 32 bit systemYou need to download the adviser archive, unpack it and open the CFadisk.inf file to edit. We find the section :
% Microdrive_devdesc% \u003d cfadisk_install, USBSTOR \\ Disk & Ven_LEXAR & Prod_JD_LIGHTNING_II & Rev_1100% Microdrive_devdesc% \u003d cfadisk_install, USBSTOR \\ Disk & Ven_JetFlash & Prod_TS1GJF110 & Rev_0.00% Microdrive_devdesc% \u003d cfadisk_install, USBSTOR \\ DISK & VEN_ & PROD_USB_DISK_2.0 & REV_P
Then change the data in the last line by specifying the copy code of our flash drive, i.e. In our example, we get:
% Microdrive_devdesc% \u003d cfadisk_install, USBSTOR \\ Disk & Ven_LEXAR & Prod_JD_LIGHTNING_II & Rev_1100% Microdrive_devdesc% \u003d cfadisk_install, USBSTOR \\ Disk & Ven_JetFlash & Prod_TS1GJF110 & Rev_0.00% Microdrive_devdesc% \u003d cfadisk_install, USBSTOR \\ Disk & Ven_Linux & Prod_File-CD_Gadget & Rev_0000
Council. If you need a USB flash drive in the device manager, you need to edit the value of the MICRODRIVE_DEVDESC variable, for example:
Microdrive_devdesc \u003d "transcend 64gb DIY SSD"
Installing the Hitachi MicroDrive driver instead of the USB drivers
It remains to replace the driver used by the USB flash drive.
Important! If the USB driver Hitachi MicroDrive is installed on a 64 bit system, then because There is no digital signature for this driver, either.
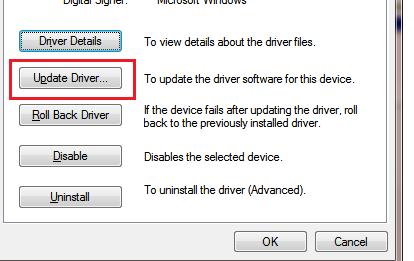
Open the DRIVERS tab and press the button. Update Drivers.. 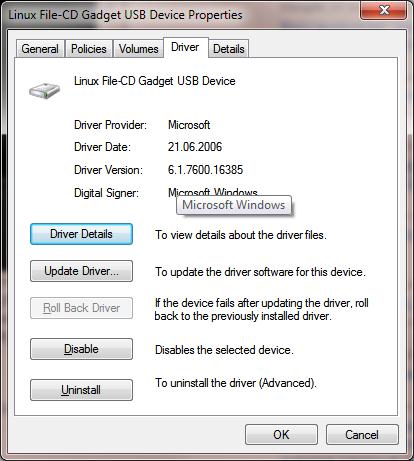
We specify the folder to the directory into which the downloaded archive with the Hitachi driver is unpacked: 
Select a new driver. 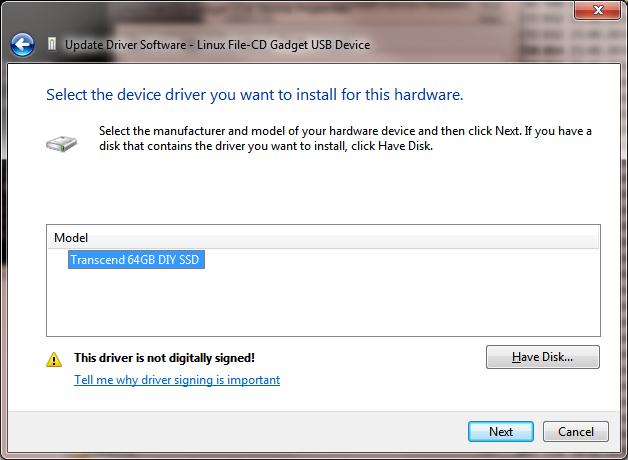
I ignore the warning about the missing digital signature of the driver. 
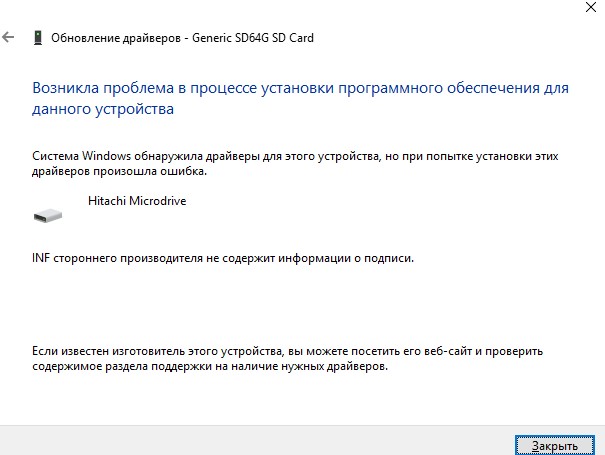
Council. In Windows 10 and Windows 8, such an error appears when installing the driver:
The Windows system has detected drivers for this device, but when you try to install these drivers an error occurred.
Hitachi Microdrive.
An infidal third-party INF does not contain signature information
To disable the driver digital signature check, run:
bCDEDITIT.EXE / SET NOINTEGRITYCHECKS ON
bCDEDITIT.EXE / SET TESTSIGNING ON
Restart the computer and try again install the driver.
It remains to restart the computer and, opening the disk manager, make sure that your flash drive has become defined as a conventional hard disk ( Type: Basic.), and the driver is used as the driver Hitachi.
Opening the conductor, you can also make sure that the flash drive icon has changed it began to be displayed as a rigid disc. 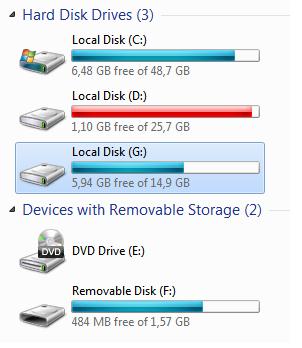
Now with this flash drive, you can work as with the usual HDD: Create partitions, specify the active partition, create dynamic disks, install software that does not work from flash drives, etc.
Important. On other Windows computers without this driver, the second section of the device will not be available.
To remove the Hitachi MicroDrive driver, open the disk properties and on the Driver tab, click the Update Driver button - the system itself will install the native driver.
Council. If after installing the Hitachi driver, the system has stopped being downloaded from BSOD, you need to download the computer from the Windows / Live CD installation disk and manually delete the following files:
- cfadisk.sys in the catalog% windir% \\ System32 \\ Drivers
- Catalog "CFADISK.INF_AMD64_ ..." from% WinDir% \\ System32 \\ DriverStore \\ FileRepositoty
Restart your computer
It should be understood that this solution will only work on the system on which the appropriate driver is installed.